|
|
|


|
|
|
The Work Order Notebook has six tabs for entering and displaying information related to a work order.
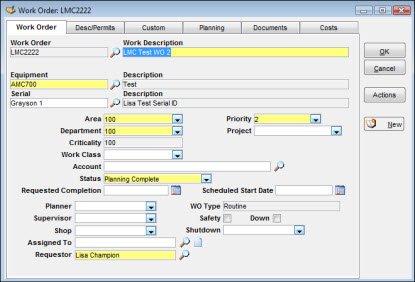
A work order becomes official when you have entered a description, identified the equipment to be serviced, and provided data for other key fields defined as required entry for your site. The Work Order tab displays a window that allows you to enter a charge number, requested completion date, work class, planner code, supervisor code, and priority code.
You can use the Descriptions/Permits tab to open a window that allows you to enter a long description and identify permits as well as procedures related to ISO 9000 and mechanical integrity.
In addition to the regular set of elements provided with TabWare, your site can create custom elements through the Setup module to establish values as add-ons to the regular set of values captured with a work order. When you click the Custom tab, a window opens to allow you to enter values for each of those elements.
The Planning tab windows available for planning work orders are Resources, Instructions, and Requisitions. From the Requisitions window, you can plan and also order materials, tools, and services.
Note: The Planning tab provides access to additional windows for defining the scope of work and describing the resources required.
You can use the Documents tab to automatically display a list of document references that exist for the equipment number and the serial number shown on the work order. This tab also provides access to any references for the Area, Department, Mechanical Integrity, and ISO 9000 values displayed for the work order and allows you to add any documents directly related to the work order to the list.
The Costs tab shows the planned and actual costs for a work order, broken out into Labor Hours, Labor, Nonstock Material, Stores Material, Services, Tools, and Other costs fields. Within each category under the Actual field, there are subtotals for internal costs and contract costs. You can also enter a value in the Estimated Cost field. All other fields are display-only, showing amounts posted to the work order to date.
The following topics provide information about using the Work Order Notebook tabs.
Entering Basic Work Order Information
Entering a Long Description and Identifying Permits
Entering Values for Custom Elements
Performing Work Order Planning
Linking Documents to a Work Order
Displaying Costs for a Work Order
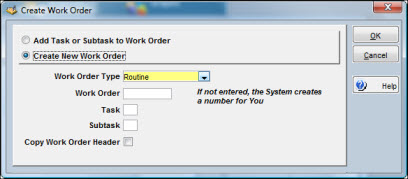
Create a new work order by clicking the New Work Order button on the Work Order Search window. The Create Work Order window displays. Using the Create Work Order window, add a task or subtask to an existing work order or create an entirely new work order. You have the option of entering a work order number and selecting a work order Type when you create a new work order.
To Enter a New Base Work Order:
|
1. |
From the Work Order Search window, click the New Work Order button. The Create Work Order window displays.
|
|
2. |
Optionally, select a Work Order Type other than Routine. |
|
3. |
Optionally, enter a Work Order Number. |
|
4. |
To copy work order header information from an existing work order, select the Copy Work Order Header checkbox and then enter the copy-from work order number (TabWare considers all information from the first three tabs of the Work Order Notebook to be header information, but you can override entries). |
|
5. |
Click OK to open a new Work Order Notebook. |
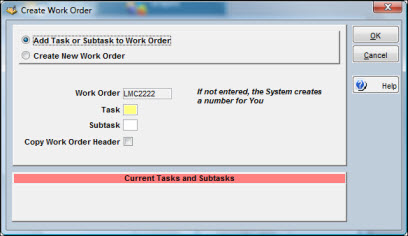
To Add a Task or Subtask to an Existing Work Order:
|
1. |
From the Work Order Search window, locate and select the desired work order. |
|
2. |
Click the New Work Order button to display the Create Work Order window with the base Work Order Number.
|
|
3. |
Enter the numbers you want to assign to the Task and Subtask. |
|
4. |
Click OK to display the Work Order Notebook with the new Work Order Number. |
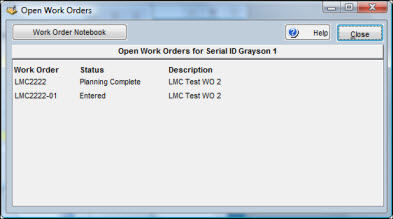
If the value you selected under Work Order Type is Routine or Emergency, a window displaying the Open Work Order list may open after you advance from the field in which you entered an Equipment Location. If the Open Work Order list displays, you can determine if the request being entered is a duplicate of one previously entered. Double-click on a work order listed in the Open Work Orders window to view it or, using the CTRL or SHIFT keys, select multiple work orders and click the Work Order Notebook button to view them. You can also use this window to add the work to an existing work order rather than create a new one. Click the Close button when you have completed your review.
To create a new Standard Request, access the Create Work Order window and select Standard Request as the Work Order Type. You can use Standard Requests to generate work orders from the Quick Work Order window.
To Generate Work Orders from a Standard Request:
|
1. |
From the Quick Work Order window, enter an equipment location. |
|
2. |
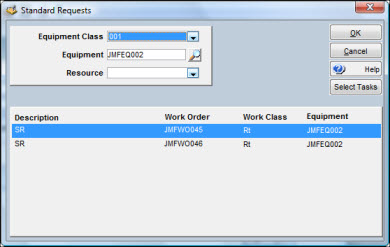
Click the Standard Request button. The Standard Requests window displays, showing a list of available requests. Optionally, search on equipment or select a resource from the dropdown menu to facilitate your search. |
|
3. |
Select one of the available requests. |
|
4. |
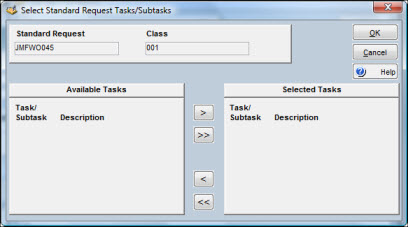
Optionally, click the Select Tasks button to discard tasks and subtasks not needed for the work order. |
|
5. |
Drag and drop selected tasks or subtasks from the Available Tasks section to the Selected Tasks section. |
|
6. |
Click OK for both Standard Request windows to generate the work order tasks and subtasks and return to Quick Work Order. |
The following topics provide more detailed information about using the Work Order Notebook.