|
|
|


|
|
|
You can view a list of documents associated with a piece of equipment from the Documents tab of the Work Order Notebook. To read a specific document, select it and click the View button. The sequence for viewing document references is Area, Department, Equipment, ISO 9000, Mechanical Integrity, Serial Number, and Work Order panels. You may need to use the PgDn key to view multiple pages. You will not see a document reference for the last four elements unless you have established a link for the particular Area, Department, etc., related to the work order.

You can use the Links button on the Documents tab to add documents directly related to a work order to the list.
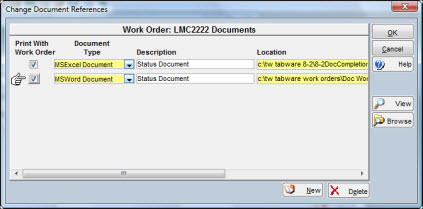
If your site has elected to automatically print linked documents with the Work Order Print, you will see the Print With Work Order checkbox on the Documents tab and in the Change Document References window. When you link a document to the work order using the Change Document References window, select the checkbox if you want the document to print automatically with the work order. For documents linked to the work order by way of area, department, equipment number, etc., click the checkbox on the Documents tab to change the setting of the Print With Work Order checkbox. Refer to Selecting Work Order Print Options for a full description of the Print With Work Order feature.
To Establish a Link:
|
1. |
Click the Links button on the Documents tab to open the Change Document References window.
|
|
2. |
Click the New button. |
|
3. |
Click Type to see a dropdown list. The types available are Adobe PDF, HTML, HTTP, MSWord and WSExcel documents. |
|
4. |
Enter a description in the Description field. |
|
5. |
In the Location field, click the Browse button on the right of the screen, navigate to and select the document. |
|
6. |
Click OK to add the reference to the database for the work order. |