|
|
|


|
|
|
You must always enter a description in the Description field. You must also enter a value in the Equipment field if you selected Routine or Emergency in the Type field. The system setup for your site determines which other fields are required entries.
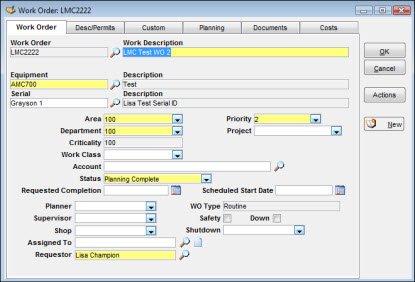
When you enter an Equipment Location, the system checks the Warranty Expires date for this Equipment Location against the current date. If the equipment is within the warranty period, a window displays the warning Equipment/Serial # is within warranty. You can then decide on the necessary values for the Account or Work Class fields to ensure that follow-up action with the manufacturer's representative will occur.
When you enter a work order, you have the option of entering a number in the Create Work Order window that precedes the display of the Work Order tab. Depending on the SetupOptions, the number can be automatically generated but not officially assigned until you enter valid values for all of the required fields. During update mode, you can enter another valid number or search for one by clicking the search icon to display values for the latest number selected.
The search icon located next to the Equipment field indicates the availability of the Equipment Popup window. When the popup displays, you can enter selection criteria, click the Search button, and then select one of the displayed entries to transfer to the Work Order Notebook.
TabWare automatically retrieves the equipment description from the database when you advance from the field in which you entered a value for Equipment.
TabWare automatically retrieves the area and department from the Equipment Location record, but these fields are not protected.
TabWare automatically retrieves criticality from the Equipment Location record.
When a work order is created, TabWare automatically retrieves the Account number from the Equipment Location record. The search icon next to the Account field indicates the availability of a popup window for selecting another account code if needed. Enter selection criteria in the popup window, click the Search button, and then select one of the displayed entries to transfer to the Work Order Notebook.
The status always defaults to Entered during Entry mode and cannot be changed. However, if your system administrator has granted you update rights, you can change the status in Update mode. Click the dropdown arrow to the right of the Status field to select a status. You can also change the status value by using the Work Order Status Change and Approval window.
During Entry mode the WO type defaults to the value entered in the Create Work Order window. You cannot change the WO Type after the first tab displays or in Update mode.
The next reviewer field only applies if your site is set up to use the Work Order Approval Process. If a next reviewer is defined in the Employee Responsibilities section of the Resources module, that name defaults into this field but you can override it if necessary.
During Entry mode, a work order can be assigned to the maintenance person who will be performing the work using the Assigned To field. Additionally, a work order can be assigned to other technicians who will be assisting in the labor effort in supporting roles. This is done through the page icon to the right of the Assigned To field. Up to six technicians can be assigned to a work order using this method.
Note: Some fields were added to the Work Order module to support the Mobile Maintenance application, which is operated on handheld devices. Sites that do not use the Mobile Maintenance application will still see the fields on the Work Order Notebook, and may have a use for them. These fields are not used by TabWare’s Scheduling module.