|
|
|


|
|
|
TabWare allows you to post receipts for an issued purchase order. For additional information on posting receipts, see Posting Service Contract Receipts in Work Orders.

To Post Receipts for a Purchase Order:
|
1. |
Click the Go To button from the Item Search or PO Search windows and select Receipts from the dropdown menu to access the Purchase Order Receipts windows. |
|
2. |
Enter a valid Purchase Order number or, optionally, click the search icon to search for a PO number. |
|
3. |
Enter a Bill of Lading number. |
|
4. |
Enter a Carrier. |
|
5. |
Enter Packing List information. |
Note: The above three (3) entries may be optional at your location.
|
6. |
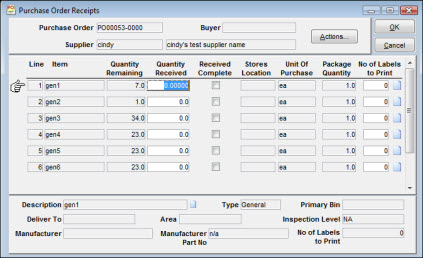
Click OK to proceed to the next window. The second Purchase Order Receipts window opens to allow entry of receipt information for line items. You cannot receive an item if the item has been defined as automatic issue upon receipt, the charge is being made to a work order, and the work order has a status of 79 – Closed for Charges. Clicking the Actions button allows you to open the Create a Filter window to select specific line items for processing, or you can highlight the line items to which you wish to post receipts and the locator finger will point to the active line. |
Note: If Multiple Warehousing is turned on, Stores Location can be entered. If it is entered, the PO lines displayed on the main PO Receipts window will be filtered based on the stores location entered.
|
7. |
Enter a Quantity Received. If the item is an inventory item and serial tracking of quantities is being done, then the serial id of the item being received will be required. When clicked, the icon beside Quantity Received will open a window for entry of the serial id. |
Note: If the item is serialized, a record of the new serial id is created and can be viewed on the Serial Notebook, accessible from the Equipment module.
|
8. |
Optionally, click the Received Complete checkbox to indicate that no further shipments are expected for that item or click the Actions button and select Mark all Items as Complete, indicating that no further shipments are expected for multiple line items. |
|
9. |
Optionally, click the Actions button to View Requirements for an item and determine if it may require special handling. |
|
10. |
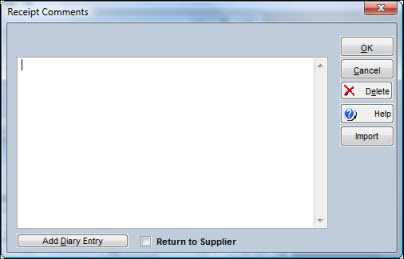
Optionally, click the extended description icon to the right of the entry line to enter any receipt comments you want to make about this item. Once the receipt is processed, comments can be viewed through Stores Activity Search. If the received item is to be returned to the supplier, indicate this by selecting the Return to Supplier checkbox; use the text section to document the reason for return. |
|
11. |
Continue to the next item, repeating steps 7, 8 and 9. |
|
12. |
Click OK to save the entries to the database and return to the first Purchase Order Receipts window for entry of the next Purchase Order Number. If you do not want to receive against another purchase order at this time, click the Cancel button. |
If the Repairables Tracking option is being used, then outside repairs are tracked on a purchase order. When an item that was repaired outside is received at the dock, use the Purchase Order Receipts window to note the Quantity Received. If the item is a serialized item, TabWare prompts you to verify that the serial number is the correct one being received.
With the Repairables Tracking feature, a repaired item that was repaired inside can be restocked or scrapped from a status of Being Repaired. Once an item that was repaired outside has been received, it is ready to either be Restocked or Scrapped. If the decision is made to restock the item, do the following:
To Restock a Repaired Item:
|
1. |
From the TabWare Power Panel, select Inventory. |
|
2. |
From the Item Search window, click the Go To button and select Repair Log Search. |
|
3. |
From the Repair Log window, perform a search and highlight the line that contains the item to be restocked. |
|
4. |
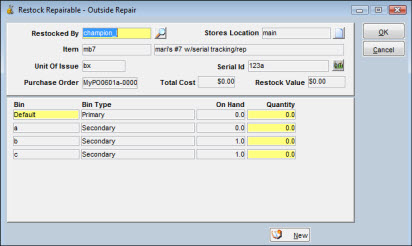
Either click the Restock button or click the Go To button and select Restock. The Restock window opens. |
Note: For an inside repair or for an outside repair charged to a work order, the repair work order cannot be closed to charges before the item is restocked.
|
5. |
Verify that the Restocked By and Bin fields are displaying the correct values. |
|
6. |
Enter the quantity to be restocked. TabWare adds the repairable to inventory at the time the restock occurs (not at the time of receipt). |
|
7. |
If average costing has been defined for the item, TabWare recalculates the average unit cost. |
Note: The value of the repair item at the time of restock is based on the Restock At value defined in Repairables setup. This can be overridden at the item level.
|
8. |
If the item is serialized, the status in the Serial Notebook is updated to Restocked. |
|
9. |
If the item is serialized and under warranty, click the icon to the right of the Serial Number field to open the serial notebook and update the warranty information. |
|
10. |
Click OK to add the item to inventory. |
The decision to scrap a repairable item can be made at several points in the repairable tracking cycle (to determine when scrapping is an option, see the flow chart in Repairables Tracking). When an item is determined to be non-repairable, use the following procedure to scrap it.
To Scrap a Repairable Item:
|
1. |
From the TabWare Power Panel, select Inventory. |
|
2. |
From the Item Search window, click the Go To button and select Repair Log Search. |
|
3. |
From the Repair Log window, perform a search and highlight the line that contains the item to be scrapped. |
|
4. |
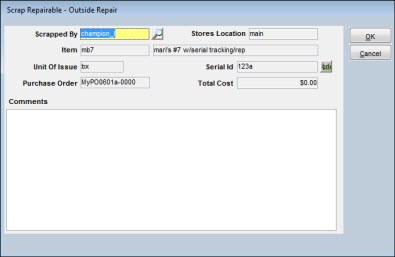
Click the Go To button and select Scrap. The Scrap window opens. |
|
5. |
Verify that the Scrapped By field is correct and add any relevant comments. |
|
6. |
Click OK. |
TabWare closes the repair work order to charges, writes scrap transactions based on the accounting options that have been specified in Setup, sets the completed date in the Repair Log to the current date and, if the item is serialized, updates the status in the Serial Number Notebook to Scrapped.
Note: From the Repair Log, Scrapped items may be viewed during a search by selecting the View Completed Repairs checkbox before performing the search.
If the decision to scrap is made after the repair has been attempted, an inside repair can be scrapped even if the repair has not been completed. Outside repairs may be scrapped from this window once they have been received.
If the repairable accounting option for your site is set up to create credit memo at time of issue, then the scrap transaction will apply the original issue value to the issuing work order. Otherwise, for the other accounting options, the repair costs will be cleared from the repair work order.
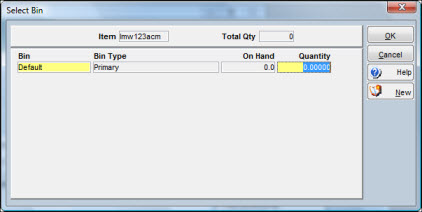
When issuing or receiving materials into stores locations, TabWare assumes that you are working out of the primary or default bin. To specify that quantities be taken out of or put into bins other than the default, indicate that information on the Select Bin window. If the bin number is shown as Default, you can overwrite this to enter a more specific bin designation. This window can be accessed through windows that are either putting materials into bins or taking materials out of bins. Since the process is basically the same, the steps below can be adapted for either situation.
To Use the Select Bin Window:
|
1. |
Click the Select Bin button. The Select Bin window opens. |
|
2. |
The window shows all bins containing the item number specified. Type over Default in the Bin column with the correct bin designation. Press TAB to move to the Quantity field. |
|
3. |
Enter the number of items to be removed from or added to the bin. |
|
4. |
If you are receiving items into bins, the Select Bin window has a New button. Click this button to add a new bin to the selected stores location. |
|
5. |
Click OK. |
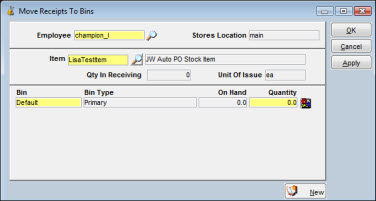
In the Item Notebook, you have the option to mark a particular item as At Receipt, Add to Quantity in Receiving. This option provides for the receipt of items that, for whatever reason, are not ready to be issued immediately upon receipt. Instead of increasing the quantity on hand in the stores location, the quantity In Receiving is incremented. When the material is ready for use, it must be moved from In Receiving to Quantity on Hand through the Move Receipts into Bins window.
To Move Material from In Receiving into a Bin:
|
1. |
Select Inventory from the TabWare Power Panel. |
|
2. |
Optionally, perform a search and highlight the item. |
|
3. |
Click the Go To button from the Item Search window and select Move Receipts into Bins. Optionally, if you have multiple stores locations, select the stores location to which the item is being moved and click OK. |
|
4. |
The Move Receipts into Bins window opens. The Employee field defaults to the current user ID, but this can be changed. |
|
5. |
If you did not perform a search in step 2, enter an item number and press TAB. |
|
6. |
Enter the quantity to be moved into a bin(s) and click OK. |
Note: The item must have been marked At Receipt, Add to Qty in Receiving on the first tab of the Item Notebook.
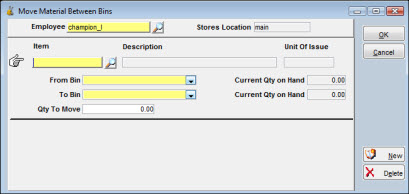
Within a single stores location, use the Move Material Between Bins window if you need to move materials from one bin to another.
To Move Material Between Bins:
|
1. |
Select Inventory from the TabWare Power Panel. |
|
2. |
From the Item Search window, click Go To and select Move Material Between Bins. |
|
3. |
If your location is using Multiple Warehousing, select the stores location on the Stores Location popup. |
|
4. |
Enter the item number or click the search icon to the right of the item number field to perform a search for the item number. |
|
5. |
Click the dropdown arrow to select the bin number from which the material is to be taken. |
|
6. |
Click the dropdown arrow to select the bin into which the material is to be moved. |
|
7. |
Enter a quantity to move. |
|
8. |
Click OK. |
If you have security access to print labels associated with receipts, you will see a Labels to Print field at the bottom of the Purchase Order Receipts window. TabWare shows the number of labels to print as 0. Enter the number of labels to be printed and click OK. Remember that you must have a Label Printer defined on the User Setup window. For additional information, see TabWare Setup-Customizing TabWare-Modules-Inventory Setup Options-Label Setup.

A checkbox on the Purchase Order Notebook identifies purchase orders that have Two-Way Match in effect. Receipts processed against this type of purchase order trigger the automatic generation of invoice records. The invoice quantity is based on the quantity received and the invoice unit cost is the same as the purchase order line unit cost. On the initial Purchase Order Receipts window, the Bill Of Lading value is required for Two-Way Match purchase orders. The value entered will be used as the invoice number of the automatically generated invoice in TabWare.
On the next window (where the quantities are entered), an invoice line is created for every purchase order line a quantity is received against. If you enter a negative value for Quantity Received, TabWare automatically generates Credit Memo records for processing through the Invoice Matching module. When dealing with Two-Way Match purchase orders, there is one important restriction: during a receiving session for a given purchase order, you cannot have mixed entries (positive and negative values) for the Quantity Received field. In addition, a negative receipt can only apply to an item with prior positive receipts.
Once the receipts are complete, an invoice is generated with the status set to the value defined in Setup for Invoice Matching-Validations-Invoice Status Code Assigned in two way match.