|
|
|


|
|
|
The Item Notebook provides detailed information about inventory items. Tabs are provided for item identification/specifications, replenishment parameters, custom elements, related documents, supplier details and ranking, quantities (on-hand, on-order, etc.), bin locations and dates, and usage history. Tabs are also provided for a cross-reference to work order plans, material requests, and purchase orders that reference the item.
Below is a brief description of each of the tabs in the Item Notebook:
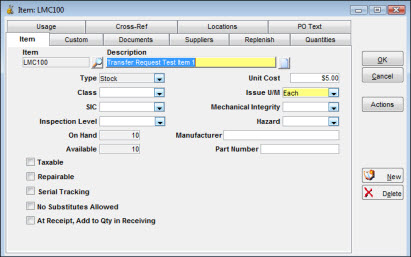
To establish an inventory item, you must access the Item tab and enter values for the required fields. This tab requires you to enter an Item Number and a Description and allows you to specify whether the item is on consignment, is hazardous, or requires inspection upon receipt. Text fields are available to enter specifications and extended descriptions.
The Custom tab displays any custom elements defined for your site. The custom elements appear for all items.
You can link documents to an inventory item using the Documents tab. The documents can be referenced to a location on a computer database or, if allowed in your location, to a physical location such as a file cabinet.
The Suppliers tab lets you list the various suppliers for an item and rank the suppliers in order of preference. You can also specify quoted lead days, unit-of-purchase, and package quantities for each supplier, as well as indicating the manufacturer and manufacturer's part number of the item being supplied. The system maintains the last price paid information.
The fields displayed on the Replenish tab allow you to specify the minimum and maximum quantities to be used for reordering items and to enter approvals, EOQ (economic order quantities), SIC (standard industry classifications), buyer ID, usage level, and stores accounts. This tab also allows you to select which order method to use when calculating item reorders.
The fields provided on the Quantities tab display inventory quantity information such as on-hand, for purchase and on purchase order. These fields also provide the quantities related to the Work Order module, including planned, required, reserved, and available. The system maintains these quantity elements without direct input from the user. In addition to the quantities, the system shows important dates, such as last received, last counted, and last issued.
The fields on the Usage tab display usage activity by accounting period. This tab also shows quantities issued, returned, received, and restocked. Values for adjustments, number of times maximum exceeded, and stockouts are also visible on this tab. These fields show summary totals for the individual accounting periods.
The Cross-Reference tab provides a listing of requisitions that have an item planned, required, or reserved. The tab also shows requisitions for outside purchase of the item and the current outstanding purchase orders that have the item included.
This tab is visible only if your location is using the multiple warehousing feature. It allows you to view information for all stores locations.
This tab is visible only if your location is using the PO Text Library feature. It allows you to view and add text that will automatically be copied to purchase orders for the item.
When the plant installs a new piece of equipment or uses a new part, you can add it to the inventory database, allowing it to be tracked.
To Enter a New Inventory Item:
|
1. |
From the TabWare Power Panel, click Inventory. The Item Search window opens. |
|
2. |
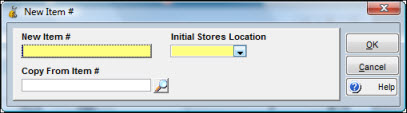
Click New Item. The New Item # window opens.
|
|
3. |
Enter a value for New Item #. |
|
4. |
If you are using Multiple Warehousing, click the dropdown arrow beneath Initial Stores Location and select a stores location where the item will be initially stocked. |
|
5. |
Optionally, enter an existing Item Number to copy from. |
|
6. |
Click OK. |
Add an inventory item to the database by entering an item number and a description in the Item window and then enter the values for any other field in the notebook that your site has defined as a required entry. The new item does not become valid until the required fields have been entered. Using this window, you can also add specifications and an extended description for the item.
If you are using the Multiple Warehousing feature, bear in mind that the information on this tab of the Item Notebook applies to the item number itself, regardless of the stores location.
The Item field is a 15-character field used to identify a unique item within your plant.
The Description field is a concise 40-character description that accurately identifies the item with keywords that can be used while searching the database. Click the note icon to the right of the description field to open the Specification window.
You can enter specifications and descriptions associated with the item in this window.
When you are adding a new item, click the dropdown arrow to see a list of types defined as Permanent. Examples of permanent items include Replenishment, Just-in-Time, Vendor Stocked, and Consignment. If you are updating an existing item with a Permanent item type, you can change to another item type if the actual quantity on hand is equal to zero. If you are updating an existing item with a Temporary item type, you cannot change it.
When the user changes Item Type on the Item Notebook, the system will automatically update the Item Type on Blanket Purchase Order lines for the item. The latest revision of the PO Line will be updated (i.e., the version of the line that has not been change-ordered). PO Lines that have been marked-as-deleted will not be updated. Also, note that the Item Type on open requisitions and non-blanket purchase orders will not be updated based on the change of Item Type on the Item Notebook. These requisitions and purchase orders will be processed (i.e., transferred to a PO/received) carrying the old value of Item Type.
Enter the unit cost for the item. This cost is maintained at the item level; it will not vary at different stores locations.
Inventory items having the same characteristics can be extracted from the database by using the Class field.
The Issue U/M (unit of measurement) field is commonly used to describe how an item is issued and costed within inventory. This description corresponds to the smallest unit that is normally used to issue an item and charge for its use. Updates will be allowed to the Issue U/M regardless of whether the item has non-zero quantities. When you change the Issue U/M, you may see one, two, or three warning messages:
Item has one or more non-zero quantities – This message is displayed if any of the following item quantities do not equal zero: On Hand, For Purchase-Unapproved, For Purchase-Approved, On Purchase Order, Planned, Required, Reserved, In Receiving, Transfer-Due In, Transfer-Due Out, Issued Out-In Transit, Awaiting Repair, Being Repaired, Not Returned for Repair. This message serves as a warning that the current quantities will not be modified based on the change to Issue U/M.
Item xxxxx has historical Usage information – This message is displayed if the item has any historical data present on the Item Notebook Usage Tab and serves as a warning that the historical quantities will not be modified based on the change to Issue U/M.
Item is planned on a Master Plan or Standard Request. Use Requisition Search to find these requisition lines and modify the Quantity Requested as needed - This message serves as a warning that the Quantity Requested on the Master Plans/Standard Requests will not be automatically modified based on the change to Issue U/M.
The warning messages will not prevent the update of Issue U/M.
Select a Standard Industry Classification (SIC) code from the dropdown list.
Select a mechanical integrity classification from the dropdown list.
When items are received from suppliers, certain items must undergo specific inspections for fitness of use. These are typically laboratory inspections, metallurgy analysis, etc. The Inspection Level field contains a code to indicate which inspections are required when an item is received.
Certain items are designated hazardous materials by OSHA and other agencies and require special handling procedures and/or equipment. Use this code to indicate which items are hazardous within your plant.
The Quantity on Hand and Quantity Available fields show summary information from all stores location for the item.
Optionally, you can enter the manufacturer and part number of the item.
Select this checkbox if the item is taxable.
Certain items can be reconditioned to a like-new or serviceable state after they have been taken out of service. Typically, the cost to restore such items is dramatically less than the cost to purchase a new item. Select the Repairable checkbox to indicate whether an item is repairable. When your system administrator sets up the Repairables Tracking, he or she selects the default account restock options for the plant. You can use this window from the Item Notebook to override that default for individual items.
Some inventory items may be tracked by serial number. If checked, the serial numbers defined in the Serial Notebook with a status of New or Restocked and associated to the item must match the quantity on hand in each bin. This flag can be checked if the current quantity on hand for the item is zero. If serial tracking is to be used, cycle count the quantity to zero for the item. Then associate the serial numbers from the Serial Notebook to the item and bin location.
Your plant may have processes and substances that must interact in a specific way. Therefore, material of construction is an absolute requirement and cannot be substituted. Select the No Substitutes Allowed checkbox to indicate that substitute items are not allowed for replenishment activities. The system forwards this code through the reordering process and passes it to purchasing to indicate the restrictions.
At Receipt, Add to Qty in Receiving
A checkmark in this box indicates that when the item is received, it is added to the quantity In Receiving rather than Qty on Hand. This can be useful when the item needs to be tested or to undergo some type of process upon its receipt at the facility before it is ready to be made available for use. When the item is subsequently moved to Qty on Hand through the Move Receipts Into Bins window, the quantity in In Receiving is decremented and the quantity in Qty on Hand is incremented.
To add extended descriptions and specifications for an item, click the icon located to the right of the Item Description field.
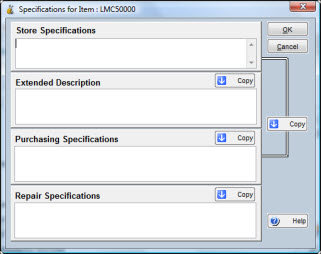
The window displayed has fields for entering Stores Specifications, Extended Description, Purchasing Specifications, and Repair Specifications. After entering text in the top field, click the Copy button immediately below that field to copy the text to the next field, or you can click the Copy button to the right of all the fields to copy the text from the first field to the next two fields. The fourth field (Repair Specifications) is used during the repairable tracking process. If the item is serialized and a repair specification exists on the serial notebook, the serial repair specification is copied to the repair requisition. If the repair specification does not exist on the serial notebook, the repair specification from this notebook is copied to the requisition.
Note: The extended description and specifications icon appears empty when there is no description stored. It appears with text lines if it contains information.
You can assign a new ID to an existing inventory item when required. After you have provided the new name, the normal process is to have JobCop implement the change throughout all records on the database.
To Rename an Inventory Item:
|
1. |
Access the Item tab of the Item Notebook. |
|
2. |
Click Actions. |
|
3. |
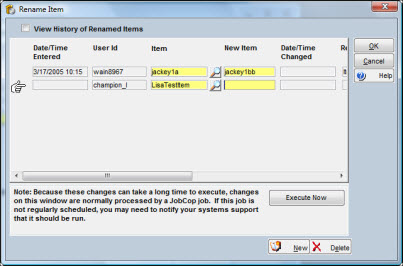
Select Rename Item. The Rename Item window opens, showing your user ID and the Item ID to be changed. |
Note: The window may display other items that have been identified for renaming.
|
4. |
Optionally, click the checkbox to View History of Renamed Items. The window displays items that have been previously renamed as well as those scheduled for renaming. Items previously renamed have a value for Date/Time Changed. |
|
5. |
Enter a value for New Item. |
|
6. |
Optionally, click New to rename another item. |
|
7. |
Click OK if JobCop will be scheduled to handle the insertion of new names throughout the database. TabWare inserts values for Current Date/Time. Click Execute Now. |
Note: Because these changes can take a long time to execute, changes on the rename window are normally handled through JobCop. If the job is not on a regular schedule, you may need to notify your systems support to have it executed. When the new name has been inserted in all related records, JobCop inserts a Date/Time Changed in the rename record.
Updating an existing item in the item notebook requires certain security privileges. For more information about obtaining security privileges to allow you to update an existing item, contact your system administrator.
To Update an Existing Item:
|
1. |
From the Item Search window, optionally click the arrow icon next to the Query field to display a list of available queries. |
|
2. |
Click the selected query. |
|
3. |
Optionally, enter a full or partial value for Item number. |
|
4. |
Click the Search button to show a list of records for inventory items matching the selection criteria. |
|
5. |
Double-click one of the records to display the related Item Notebook. |
|
6. |
Update the existing item as necessary. |
The following topics provide information about using the Item Notebook tabs.
Entering Values for Custom Elements
Assigning Supplier Information to an Item
Entering Replenishment Information
Displaying Item Usage Information
Displaying Item Cross-Reference Information