|
|
|


|
|
|
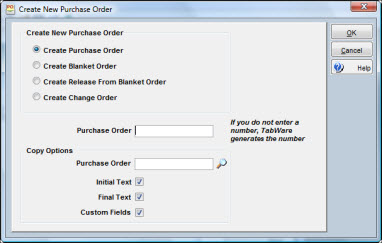
You can create a new PO from the Purchase Order Search window. When you click the New Purchase Order button, the Create New Purchase Order window displays. On this window, you can select a PO type and have the option of entering a PO number as well as copying information from another PO.
The Create New Purchase Order window provides key information for setting up a purchase order. There are four PO types:
A routine purchase order authorizes a supplier to provide goods and services, usually at a set price, for delivery on a specific date.
A blanket order represents an agreement to purchase goods and services over a given period of time. It does not authorize a supplier to make shipments. Creation of blanket orders is a secured option, separate from creating a regular PO.
A release is similar to a routine PO in that it authorizes a supplier to provide goods or services. It is tied to a blanket order that describes the items, quantities, prices, and terms of the purchase.
Creation of a change order usually occurs after a regular PO, blanket order, or release has been issued to the supplier. It confirms the addition or deletion of items or can modify previous agreements as to price, quantity, and delivery date.
To Enter a Purchase Order:
|
1. |
Click the New Purchase Order button in the PO Search window to open the Create New Purchase Order window. |
|
2. |
Select the type of purchase order to create by clicking the appropriate radio button. |
Note: The default value is Create Purchase Order. You must enter a number in the Purchase Order field if you have selected Create Release from Blanket Order or Create Change Order. For the other two types, a number can be automatically generated if your site has elected to use that feature. See your system administrator for information on the procedure in effect for your site.
|
3. |
Optionally, enter a PO number in the Copy Options section and select options for copying information from another PO. |
|
4. |
Click OK. |
The Purchase Order tab lets you enter PO header information and designate a supplier. There are also access paths to the Supplier Notebook and the PO Activity Log, and windows for entering initial and final text. This is the first tab displayed when you select the Purchase Order Notebook from another window. You can access this tab from the Purchase Order Search window by double-clicking a displayed PO or clicking the New Purchase Order button.
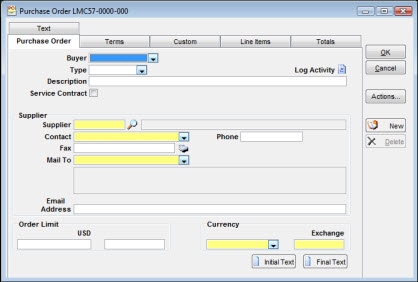
Select the Buyer and Type from the dropdown lists. If the PO was auto-generated by JobCop's Automatic PO Generation feature, the words Auto-Generated will appear to the right of the Type field.
Enter text in the Description field to briefly describe the purpose of the PO, such as Planned parts for April shutdown. The description you enter becomes available for display with queries developed for the PO search.
Access the Log Activity tab by clicking the icon on the right in the purchase order header information section.
Select this checkbox ...
When you select a supplier, TabWare retrieves information for the person designated in the Primary Contact field. A message displays if the contact's fax number is different from the supplier's number. If a default mailing address has been designated for this supplier, it will display in the address window. If not, you can select the mailing address code for the supplier by clicking the dropdown arrow. You can access the notebook for the PO's supplier by clicking the icon next to the Fax field. If there is a primary contact for the supplier, the contact’s phone number will display; otherwise, the phone number for the supplier displays.
When you select a supplier, TabWare retrieves information for the person designated in the Primary Contact field. A message displays if the contact's email address is different from the supplier's address. This field is required when using the email option to send the official copy of the purchase order.
Both the Order Limit and Currency fields default to values taken from the Supplier Notebook for the PO supplier.
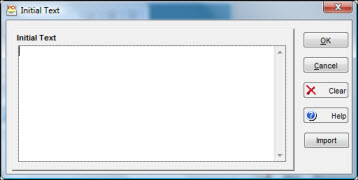
Click the Initial Text or Final Text button to add comments that will appear in the body of the purchase order. When you print the PO, initial text appears in the PO body immediately above the first line of the first line item. Final text appears below the last line of the last line item.
![]()
There are separate windows for entering each type of text. If you are entering text for a Blanket Order, the format of the window changes to allow for entering text that belongs to the blanket order as well as releases generated from a blanket order. Click Copy to copy information from the area for Blanket text to the area for Releases text.
Click Clear to remove existing text from the window area next to the cursor.
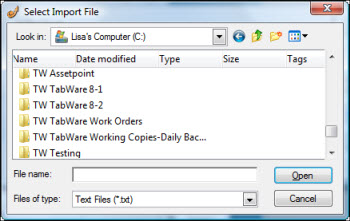
Click Import to copy the contents of a text file into the window area next to the cursor. Clicking the Import button opens the Select Import File, where you can locate and open the file to be copied.
Standard text can be added to the purchase order by use of the PO Text Library.
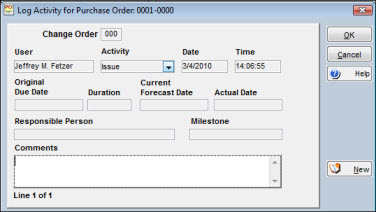
As a PO progresses from entry through closing, you can use the Purchase Order Activity Log window to record significant events or activities. Access this window by clicking the icon to the right of the purchase order header information.
To Enter Activities and Comments:
|
1. |
Click the icon to the right of the PO header information on the PO tab of the PO Notebook or click the Diary Entry button on the Comments tab of the Supplier Notebook. |
Note: If you select the Diary Entry option, the log window displays showing your user ID, the current date, and time.
|
2. |
Select an Activity code from the dropdown list. |
|
3. |
Enter information that applies to the PO in the Comments field. |
|
4. |
Click the New button. |
|
5. |
Repeat steps 2 and 3 to enter additional information with another activity code. |
|
6. |
Click OK when you have completed your entries. |
Use the Terms tab to enter shipping and billing information and the preferred method for transmitting the PO to the supplier.
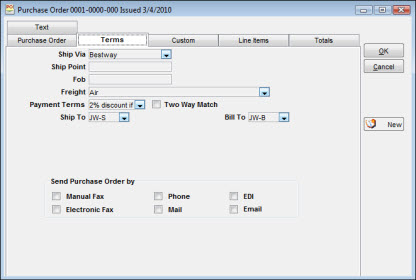
The Ship Via, Ship Point, FOB, Freight, Two-Way Match, and Payment Terms fields display information taken from the Supplier Notebook. You have the option of changing any of these values before issuing the PO.
Ship To and Bill To values display if your site selected a default Purchasing Address from the Setup module. Otherwise, you can select Ship To and Bill To criteria from the dropdown list. You can also change the values of displayed defaults.
The Terms tab shows six methods of transmitting a PO to the supplier. Choose one or more methods by selecting the appropriate checkbox.
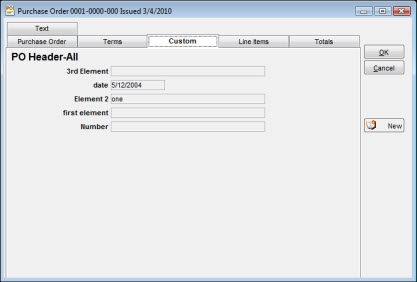
Use the Custom tab to assign values to the custom elements fields defined for your site. Depending on your site setup, an element can be required entry, validated, or both. A custom element represents a field of information that is unique to your operating environment and therefore is not available from another TabWare window. Through the Setup module, your site can have custom elements established as add-ons to the regular set of values. Click the dropdown arrows to the right of each field to select previously assigned values or enter new values.
The Line Items tab provides a set of tabs for identifying one or more items being ordered from the supplier. For each item ordered, you specify quantity, unit price, unit of purchase, distribution of charges, and delivery information. You can also link documents to an item. There are six tabs for managing line item information:
After accessing the PO Notebook for a particular PO, click the Line Items tab. The Summary tab displays first. The pointer in the left margin points to line item number one.
The Detail tab provides key information such as item number and description, manufacturer's part number, quantity, price, unit of purchase, and due date.
Use the More Detail tab to specify delivery information, a Stores Account, and details about the item that should be available to personnel in the receiving area.
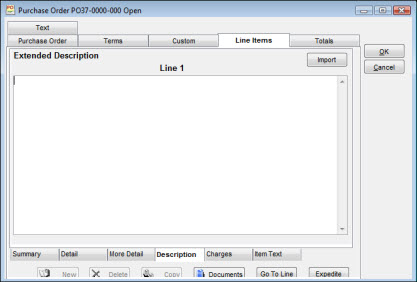
In addition to a 40-character short description from the Detail tab, you can enter information here by clicking the Description tab.
Charges
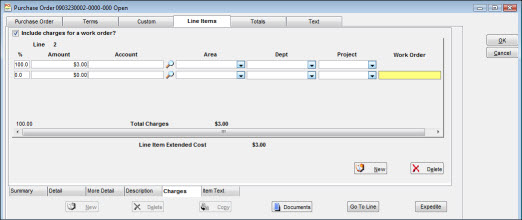
By clicking the Charges tab, you can allocate the cost of the item to multiple accounts and, optionally, to a single work order.
By clicking the Item Text tab, you can add or remove any text associated with the item from the PO Text Library.
The following buttons are available at the bottom of the Line Items window:
Click the Copy button at the bottom of the tab to copy line items from another PO.
To link documents to an item, click the Documents button from the bottom of the window for the Summary, Detail, and More Detail tabs.
If you want to view another line item, you can use one of two methods. From the Summary panel, click the item you want to view and then click the tab or button that applies. Alternatively, you can click the Go To Line button and then enter a number in the Line field.
Click this button to jump to the Expediting Milestone window.
As you enter line items to a PO, TabWare adds a line of information to the Summary tab. When you have large POs with many items, you can display the Summary list and use the Go To Line button to transfer directly to another item.

When creating a PO, you can copy line items from an existing PO to the one being created.
To Copy Items from Another Purchase Order:
|
1. |
Click the Line Items tab from the Purchase Order Notebook. |
|
2. |
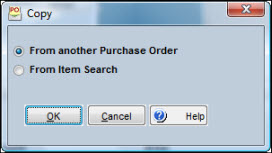
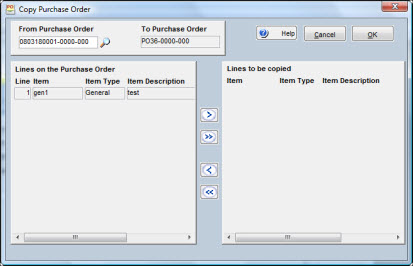
Click the Copy button to open the Copy window. This button is available from the Summary, Detail, and More Detail tabs. Select whether to copy from another purchase order or from the Item Search window.
|
|
3. |
Click the question mark icon to search for a purchase order (see Using the Purchase Order Search Popup Window below) or enter a purchase order number. |
|
4. |
Click one or more of the line items displayed in the data window for Lines on the Purchase Order. |
|
5. |
Click the right arrow to transfer the items selected. |
Note: If you want to copy all items on the selected PO, click the double right arrow. You do not have to highlight the items before you click the double right arrow.
|
6. |
Optionally, use the left arrow and double left arrow buttons to reverse the selection process. |
|
7. |
Click OK. |
You can use the Purchase Order Search Popup window to perform a search for purchase order information. Access the Purchase Order Search Popup window by clicking the magnifying glass icon to the right of the From Purchase Order field on the Copy Purchase Order window.

To Perform a Search:
|
1. |
Click the dropdown arrow to display the list of available queries and select a query, or enter a full or partial value for the PO and Item fields at the top of the window. |
|
2. |
Select the Show Change Orders checkbox to include change orders as well as the latest POs in the search results. |
|
3. |
Click the Search button to display a list of records for POs matching the selection criteria. |
|
4. |
Double-click one of the records displayed or highlight the record and click OK. |
Note: Items defined as Temporary cannot be copied.
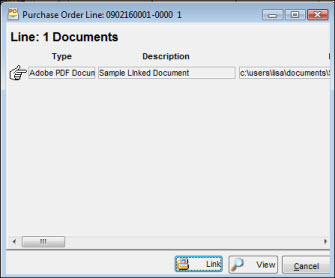
When adding line items to a PO, you can link documents to an item. Click the Documents button to link documents to the line item. Use this window to associate an item to a location on a computer database or, if allowed in your plant, to a physical location such as a file cabinet.
To Establish a Link:
|
1. |
Click the Documents button to open the Purchase Order Line Documents window. |
|
2. |
Click the Link button to open the Change Document References window.
|
|
3. |
Click Type to see a dropdown list. The types available are Adobe PDF, HTML, HTTP, MSWord and WSExcel documents. |
|
4. |
Enter a description in the Description field. |
|
5. |
In the Location field, click the Browse button on the right of the screen, navigate to and select the document. |
|
6. |
Click OK to add the reference to the database. |
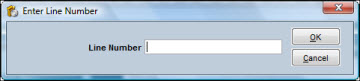
You can jump from one line number to another by clicking the Go To Line button. When the Enter Line Number window displays, enter a line number and click OK.
You can achieve the same result from the Summary window by clicking one of the items displayed and then clicking the applicable tab.
When creating a new PO, click the Line Items tab to access the Detail window. If you open an existing PO that has line items, the Summary window displays when you click the Line Items tab. Click the Detail tab to display the detail window.
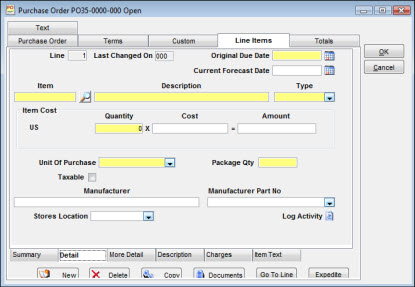
Original Due Date represents the expected delivery date that was entered when the purchase order was created. Current Forecast Date can be updated as needed to show a revised delivery date. This revised date can also be entered through expediting windows.
This is a required entry field. If you enter a number that exists in the inventory table, TabWare automatically retrieves the type, description, unit of purchase, and other available information. When entering numbers not in the inventory table, you must enter values for these fields.
If you entered an item number that exists in the stock item table, TabWare automatically retrieves the value for type and protects the field. Otherwise, item type becomes required and you must select from the dropdown list.
These requirements apply when you are entering items to a purchase order identified as Service Contract in the notebook. The item being entered must belong to an item type previously defined through Setup as allow service contract charges. The quantity ordered must always be 1. Unit cost determines monetary scope for the item.
This is a required field. When you enter an item number that exists in the stock item table, TabWare automatically retrieves the description and lets you override it. Otherwise, you must enter text to describe the item. In addition to the 40-character description, you can further describe the item by clicking the Description tab.
After entering a quantity, you can enter a value to the Cost or Amount field. If you enter a Cost, TabWare computes the extended cost for insertion in the Amount field. If you choose to enter an extended cost in the Amount field, TabWare divides the Amount by the Quantity and inserts the result in the Cost field. If the supplier's currency differs from your plant's currency, TabWare displays the unit cost and extended cost in both currencies.
If the item appears in the stock catalog, the following fields will display default values from the Suppliers tab of the Item Notebook: Unit of Purchase, Package Qty, and Manufacturer's Part No. TabWare automatically inserts a value of N/A for Manufacturer Part No if the inventory item record shows a blank value. The two Tax fields (which display when Taxable is checked) obtain their default values from the Item Notebook. If the notebook does not have any of these values, TabWare requires that they be entered manually. If you choose to add an item, the Stores Location is defaulted from the item search if the stores location is part of the search.
If the item on the purchase order is repairable, is being sent for repair, and is being tracked by the Repairables Tracking feature of TabWare, then the word Repairable will display beside the tax information on the tab.
The Stores Location uses your default stores location unless the item is not stocked in that location. This is a required entry if the item being purchased is not a service or a general item and if the purchase order is not a blanket. Click the dropdown arrow to select a stores location or to revise the stores location shown. The Stores Location indicated is the location into which the items will be received and the quantity on hand incremented.
Click the Log Activity icon to the right of the Stores Location field to access the PO Activity Log window.
After completing the Detail window showing item number and description, click the More Detail tab to enter delivery information and information that should be made available to personnel in the receiving area.
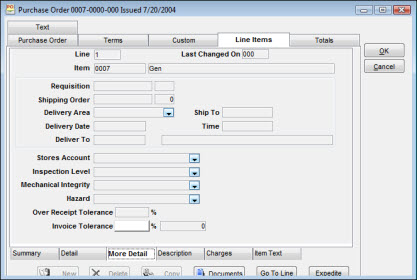
The three Delivery fields and the delivery time obtain default values from the Requisition value, if shown. If no Requisition value is provided, enter values that apply. The Requisition field indicates the number of the requisition from which the referenced line item was copied and indicates its line number in the requisition. The Shipping Order field gives the same information if a shipping order exists that contains the line item. The following fields obtain default values from the Item Notebook for stock catalog items: Stores Account, Inspection Level, Mechanical Integrity and Hazard. If no default values are provided, you can enter values that apply.
In cases where a single purchase order needs to have a designation of more than one physical shipping address, TabWare allows the identification of the shipping address at the line level rather than a single address. The mechanism to do this is through the use of delivery area on the Requisition line. Each plant can associate all of their defined delivery areas to a shipping address defined in Validation Codes-Purchasing Addresses. At the time the requisition line is transferred to the purchase order, the associated shipping address code to the delivery area will be assigned to the purchase order line. If the delivery area does not have a shipping address assignment (or is not used at all in the Requisition module), then the default shipping address for the plant will be assigned to the purchase order line.
When the purchase order is printed, the purchase order printout will be sorted by shipping address and then purchase order line, with a page break for each change in shipping address.
The Over Receipt Tolerance field derives its default value from the Define Item Types Window in Setup. You can override the value here at the line item level by entering an appropriate value.
The Detail window allows only a 40-character description. To include additional information, click the Description tab and enter more information or click the Import button to copy text from another file for display in this window.
When adding a line item to a PO, you have the option of assigning Account Numbers or a Work Order as the charge to information.
Note: You cannot enter a work order number that has a status of 79—Closed for Charges.
Settings for a work order charge can be different from a charge to area, department, account, and project. Dictionary settings determine the use of individual fields. Charge information is not required if a stores Account number exists on the More Detail panel.
To Enter Charge Information:
|
1. |
Click the Line Items tab on the Purchase Order Notebook. |
|
2. |
Select a line item for an existing PO from the Summary window and click the Charges tab. |
|
3. |
Optionally, select the Include Charges for a work order? checkbox if you want to include a work order number in the distribution. |
|
4. |
Enter values for Work Order number and Account, Area, Department, and Project numbers. |
|
5. |
Enter percentages next to each charge entry or enter dollar amounts to bypass the use of percentages. |
Note: TabWare computes the dollar amount based on the value in the Total Extended Cost field. If you are entering percentages, the total for all entries must equal 100 percent. If you are entering money amounts, the total for all entries must balance with the value in the Total Extended Cost field shown at the top of the window.
|
6. |
Click OK. |
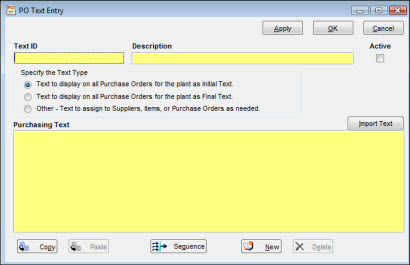
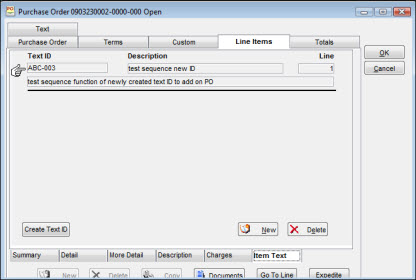
This tab is visible if your site is using the PO Text functionality defined in Purchasing Setup Options. This text will be automatically associated with the purchase order line for an item.
To Link an Additional Block of Text:
|
1. |
On the Item Text tab, click the New button and enter the desired Text ID or click the magnifying glass icon to search for the desired text. Once the Text ID is entered, the window displays the 40-character description and one row of text. The description and text cannot be modified on this window. To change the description or the text, go to the Purchasing Text window in the PO Text Library. |
|
2. |
An error message will display if you enter a Text ID that is flagged in the PO Text Library as display on all Purchase Orders as Initial Text or Display on all Purchase Orders as Final Text. Only text identified with a type of Other can be assigned to the item on this tab. |
|
3. |
An error message will display if you attempt to assign an inactive text ID. |
To Delete a Text Assignment:
|
1. |
Select the Text ID to be deleted. |
|
2. |
Click the Delete button to remove the text for this purchase order line. |
To Create a Text Block and Assign:
If you have access to create standard Text IDs, the Create Text ID button will be visible. Click the Create Text ID button and the PO Text Entry window opens (for more information on how to create Text IDs, see PO Text Tab). Once the text ID is created, it is available to be added to this tab by clicking the New button.