|
|
|


|
|
|
The choices you make in this set of windows determine how the Purchasing module operates in your environment. There are eight tabs for grouping information and one tab for sending information:
General
Purchase Order Numbering
Blanket Order Numbering
Request for Quote Numbering
Defaults
Variance
Tolerance
RFQ Setup
Email Setup
The General tab applies to reports printed from the Purchase Order module, the Request for Quote module, and the Shipping Order function. The Request for Quote Numbering tab and the RFQ Setup tab apply to the setup of the Request for Quotation portion of the Purchasing module, while the other five tabs pertain to setting up the balance of the purchasing requirements.
To Access Purchasing Setup Options:
|
1. |
Click the Setup icon on the TabWare Power Panel. |
|
2. |
Click the Customizing TabWare button on the Setup Power Panel. |
|
3. |
Click the Setup Options button on the Customizing TabWare window. |
|
4. |
Scroll down the Modules block on the System Setup window and highlight Purchasing. |
|
5. |
Click the Setup Options button to open the Purchasing Setup Options window. |
|
6. |
Enter values for the appropriate blocks. |
|
7. |
Click OK. |
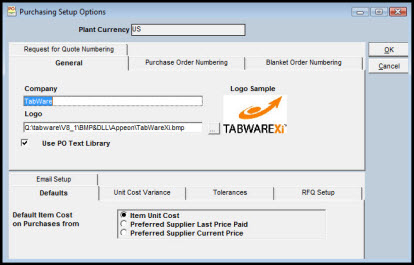
Plant Currency
The value displayed represents the currency code being used by your plant for financial transactions. This choice was made by your system administrator using the Validation Codes Valid Values window.
General Tab
When printing reports from Purchasing, Request for Quote, and Shipping Orders, TabWare provides the ability to print the company name and logo on the report. Each plant defined in TabWare can have its own name and logo printed on these reports.
To Define the Company Name and Logo for a Particular Plant:
|
1. |
Enter the company name in the Company field exactly as you want it to print on the report. |
|
2. |
In the Logo field, enter the path to the subdirectory where TabWare can find the logo in bitmap (.bmp) format. You can click on the Windows browse button to the right of the field and navigate to the subdirectory to select it. |
Selecting this option allows the use of the PO Text Library, where the user to build text such as Terms and Conditions that can be used on purchase orders. For more information, see Setup and Use of Purchase Order Text Library in Purchasing.
Purchase Order/Blanket Order Numbering Tabs
There are two sets of options for numbering purchase orders: one for regular purchases and one for blanket orders. The second set of options can be accessed by clicking the Blanket Order Numbering tab at the top of the window. The explanations provided below apply to both numbering methods.
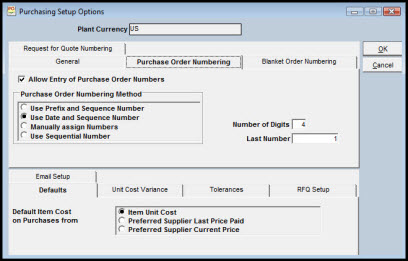
Allow Entry of Purchase Order Numbers
Select this option if, during entry of a PO, you want the user to have the option of manually assigning a PO number. An empty check box indicates that a user relies on the automatic numbering feature.
Purchase Order Numbering Method
The length of a PO number cannot exceed 10 characters including a prefix (if you choose to use one). You can have separate methods for numbering blanket POs and regular POs and can choose from four basic numbering methods :
Use Prefix and Sequence Number
Use Date and Sequence Number
Manually Assign Numbers
Use Sequential Numbers
In addition, you can select the Use Same Method As Purchase Orders option for blanket POs.
Enter a prefix from one to five characters if you selected the option User Prefix and Sequential Number.
This field is not required if you selected the Use Date and Sequential Number option. If you are using a prefix, enter the length of the numeric portion of the PO number. Remember that the length of the prefix plus the length of the numeric portion cannot exceed 10 characters. If you do not specify a prefix, the number of digits can be any amount up to 10 characters.
Enter a zero in this field if you want the first PO number to be a 1 preceded by leading zeros. Otherwise, enter a value for use in numbering the next PO number assigned.
Defaults Tab
During creation of a purchase order, you can have TabWare retrieve and display a unit cost for items carried on inventory records. You can choose the source of the unit cost by selecting one of the following options: (1) item unit cost as shown on the inventory record, (2) the last price paid by the preferred supplier for that item, or (3) the current price quoted by the item's preferred supplier.
Unit Cost Variance Tab
Values entered on this tab enable monitoring of unit cost as it passes from a requisition to a purchase order. For the Evaluation Minimum field, enter a money amount. For the Variance Percentage field, enter a percentage with decimal places (if necessary). Users will then receive warnings when the unit cost being processed exceeds the Evaluation Minimum and the calculated variance exceeds the Variance Percentage. The Copy Text for Change Orders checkbox will indicate the default option that appears at the time a change order is created. If checked, the initial and final text will be copied from the previous change order to the new one.
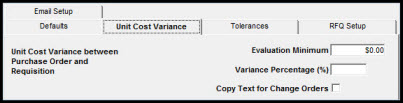
Unit cost checking occurs when any of the following actions occur:
award of a Request for Quote item originating from a requisition
transfer of an RFQ item to a purchase order when it originated from a requisition
transfer of a requisition item to a purchase order.
Tolerances Tab
There are two fields for entering money amounts that are used in the issue and control of purchase orders.
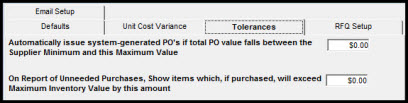
If you choose to use the automatic issue feature for auto-generated POs, you can set a range of money values for deciding which POs can be automatically issued. The range consists of: (1) the Supplier Minimum order value at the lower end and (2) the Maximum Value you specify in this setup option.
By entering a money value to this field, you can control the number of inventory items that qualify for inclusion on the report. A zero value causes all items over maximum inventory limits to appear on the report. This means low-cost as well as high-cost items will be included. If you enter a value greater than zero, you will only see items reported where the total potential cost exceeds the maximum level’s extended cost by the money value entered here.
Request for Quote Numbering Tab
The options selected by the system administrator on the Request for Quote Numbering tab determine how TabWare operates when processing Request for Quote information.
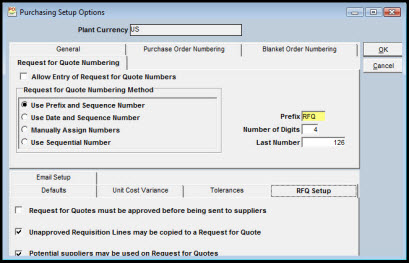
Allow Entry of Request for Quote Numbers
This checkbox applies if you are using the automatic numbering feature. With this checkbox selected, TabWare lets the user enter an RFQ number when creating a new Request for Quote. Manual entry of the number overrides the automatic numbering feature.
Request for Quote Numbering Method
The overall length of the RFQ number, including optional use of a prefix, cannot exceed 10 characters. There are four methods to choose from - three for automatic numbering and one for manual numbering. The following instructions apply to automatic numbering.
Use Prefix and Sequence Number
Prefix can be one to five characters long. Use of the hyphen character is not allowed. Define the sequential portion by entering a value for Number of Digits and Last Number.
The date portion of the number equals today’s date in YYMMDD format. For sequence, the Number of Digits must be greater than two. Last Number is an optional entry.
RFQ Setup Tab
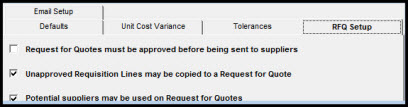
RFQs Must Be Approved Before Being Sent to Suppliers
With this option selected, RFQs must pass through the Approve to Send status. This becomes a required action that has to be completed before the user can print the official copy of the RFQ. If the approval option is not selected, the official copy can be printed on completion of the RFQ data entry process.
Unapproved Requisition Lines May be Copied to an RFQ
With this option selected, the user can transfer unapproved requisition lines as well as approved lines to an RFQ. Keep in mind that unapproved lines copied to an RFQ cannot be copied to a purchase order until approved at the requisition level.
Potential Suppliers May be Used on RFQs
Selecting this option allows the user to send the RFQ to a company that does not now exist on the supplier database. Entry of an unlisted supplier ID causes display of a window for creating the Potential Supplier with inactive status for purposes of processing the RFQ. If this option has not been selected, an error message displays when the user enters an unlisted supplier ID.
Email Setup Tab
The information on this tab pertains to sites that will be using the Email option to send the official copy of the RFQ and/or purchase order. Use of this option requires that additional software be loaded on your desktop. This software will create an email and attach the official document as a PDF.
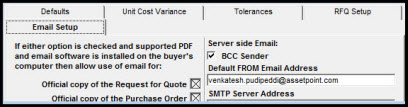
Official Copy of the Request for Quote
If this is checked, then the Send By option for Email on the Supplier tab of the RFQ notebook will ensure that, at the time the official copy of the RFQ is printed, this software will be called by TabWare to email the RFQ to the supplier.
Official Copy of the Purchase Order
If this is checked, then the Send By option for Email on the Terms tab of the Purchase Order notebook will ensure that, at the time the official copy of the Purchase Order is printed, this software will be called by TabWare to email the purchase order to the supplier.
This option is only available for CDS (Centralized Delivery Solutions) customers at this time. Server side email does not require the purchase of additional software to send PDF files of RFQs and POs, but it does require additional setup. The RFQ or PO will be emailed using your SMTP server.
Note: Contact TabWare Support if you are interested in this feature. They can tell you more about CDS and whether you qualify to use SSE.
Select this option if you would like a copy of the RFQ or PO sent to the sender as Blind Carbon Copy.
Enter the address to be displayed as the From address on the email.
Address of your SMTP Server