|
|
|


|
|
|
The Supplier Notebook has several tabs that display pertinent information about the companies who supply goods and services to you.
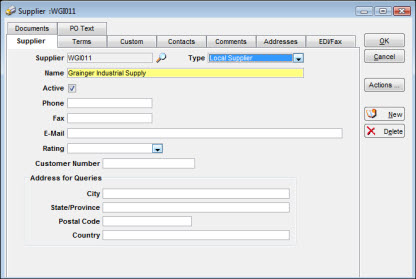
When entering a new supplier, you must provide information on this tab to make the supplier a valid entry in the database. Using the Supplier tab, you establish the Supplier ID and enter key information about the company.
The Terms tab includes shipping information as well as financial information. You can specify a foreign currency if it applies to the particular supplier. You can also enter amounts for the Minimum Order and Credit Limit fields.
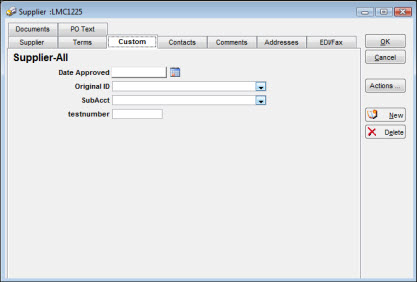
The Custom tab displays client-unique information that is not otherwise defined through language translation or standard data elements.
The Contacts tab lets you identify supplier personnel who are the primary contacts for placing orders, making payments, and obtaining order status information.
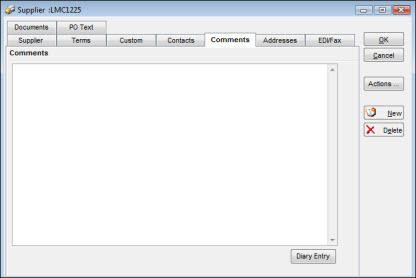
The Comments tab provides space for logging comments related to your dealings with the supplier, including remarks on performance.
The Addresses tab provides information to the Invoice Matching module for the processing of supplier invoices. It allows entry of multiple mailing, remittance, and shipping addresses for a single supplier.
The EDI/Fax tab provides information to the Request for Quote and Purchase Order functions on how the RFQ and purchase order are sent to suppliers. It allows separate Send By options for each type of document.
This tab enables you to link documents to a supplier.
This tab allows you to cross-reference an entry in the PO Text Library to this supplier. Any entry for the supplier will appear on purchase orders for the supplier.
At a minimum, you must enter a Supplier ID and Name on the Supplier tab in order to set up a new supplier. You can also enter other basic information, including the supplier's e-mail address and your customer number with this supplier.
Enter from 1 to 15 characters in the Supplier field to provide a unique identity for the supplier. You can use letters, digits, or special characters. Select a Type from the dropdown menu, and then enter the supplier's full Name.
If the Active checkbox is empty, then the supplier has an Inactive status and cannot be used on requisitions, requests for quote, or purchase orders. You can still access the records of inactive vendors for display in queries for historical purposes.
When the Supplier ID identifies a specific supplier, you can use the Customer Number to identify your company on the supplier's records. Using this number speeds communication when you contact the supplier.
Enter values to one or more of these fields if you intend to build custom queries that search for location information.
While creating a Request for Quote (RFQ), you may want to request pricing information from a supplier that does not have Permanent status. To accommodate this process, the company can be added to the database as a Potential Supplier. The term Potential Supplier appears in the title bar of the Supplier Notebook to identify this category of supplier. While in Potential status, the supplier cannot be selected during creation of a purchase order.
To change a supplier from Potential to Permanent status, click the Actions button and then select Make Permanent. You can then assign a permanent supplier ID and add other appropriate information. TabWare copies information from the RFQ to the permanent record for your review and update, if needed.

To Change the Potential Supplier to Permanent Status:
|
1. |
Access the Supplier Notebook for the Potential Supplier. |
|
2. |
Click the Actions button. |
|
3. |
Select Make Permanent. TabWare displays information from the Potential Supplier record and opens fields that were previously protected. |
|
4. |
Enter a Supplier ID, update existing information, and add values for fields required by your site. |
|
5. |
Click OK to add the supplier in Permanent status. |
When necessary, you can assign a new ID to an existing supplier. After you have provided the new name, the normal process is to have JobCop implement the change to all records in the database.
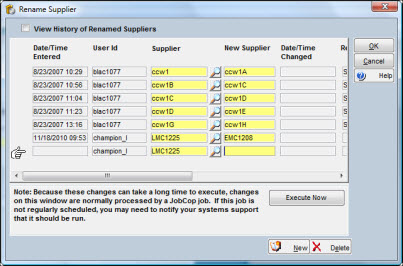
To Rename a Supplier:
|
1. |
Access the Supplier tab of the Supplier Notebook. |
|
2. |
Click Actions. |
|
3. |
Select Rename Supplier. The Rename Supplier window opens, showing the current user ID and the Supplier ID to be changed. |
Note: The window may also display other suppliers that have been identified for renaming.
|
4. |
Optionally, click the checkbox to View History of Renamed Suppliers. The window displays suppliers that have been previously renamed as well as those scheduled for renaming. Suppliers previously renamed have a value for Date/Time Changed. |
|
5. |
Enter a value for New Supplier. |
|
6. |
Optionally, click New to rename another supplier. |
|
7. |
Click OK if JobCop will be scheduled to handle the insertion of new names throughout the database. Otherwise, click Execute Now to begin the rename process. |
Note: Because these changes can take a long time to execute, changes on the rename window are normally handled through JobCop. If the job is not on a regular schedule, you may need to notify your systems support to have it executed. When the new name has been inserted in all related records, JobCop inserts a Date/Time Changed in the rename record.
The Terms tab contains shipping information for default POs as well as financial data such as payment terms, credit limits, and minimum order amounts.
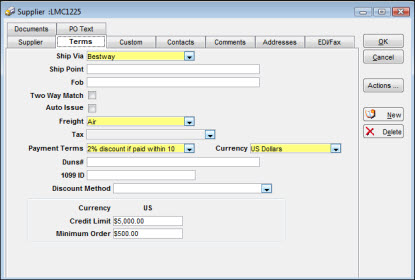
Information contained in the Ship Via, Ship Point, FOB, Freight, and Payment Terms fields provide default values to corresponding fields on a PO being created. The Ship Via field is designed to hold either specific carrier information or general information regarding the method of shipping, such as Best Way or Supplier Truck. The Freight field is used to capture instructional information such as Pre-pay, Direct, etc.
Select this checkbox if you want the supplier to qualify for two-way match processing. The setting chosen here automatically defaults to purchase orders awarded to the supplier. This checkbox is only visible if your installation is using either Invoice Matching or the Invoicing Interface. For more information on two-way matching, see Using the Two-Way Match Feature in Invoice Matching.
If this checkbox is selected and an auto-generated purchase order exists for the supplier with this flag checked, then the Auto Issue of Purchase OrdersJobCop job will issue this supplier’s auto-generated purchase order.
You can assign a Tax Code tied to a percentage for calculating a tax amount on the PO and/or on the invoice to the items you buy from the supplier. The percentage, if applied, uses line item extended cost.
If you pay the supplier in a foreign currency, you can select it from the Currency dropdown list.
The Data Universal Numbering System, abbreviated as DUNS, is a system developed and regulated by Dun & Bradstreet (D&B) that assigns a unique numeric identifier, referred to as a Duns number, to a single business entity. If your company has or uses a Duns number, enter it here.
You can enter a federal tax ID or social security number in the 1099 ID field if you are obligated to provide a 1099 form covering reportable income.
If your system administrator has selected the option Allow setup at supplier level in the Setup module, a Discount Method field will be visible. From it, you can select one of the following options:
Always apply regardless of date
Calculate based on invoice date
Calculate based on invoice received date
Calculate based on current date
Credit Limit and Minimum Order
If applicable, enter values in the Credit Limit and Minimum Order fields. If there is a foreign currency identified, the system converts and displays the amounts in a second column.
The Custom tab enables you to enter and display supplier information not otherwise covered in the Supplier Notebook. These fields, which are defined through the Setup module, are for information that is unique to your particular site. If your site has defined any custom elements as required entry, you must complete those fields before you can click OK to add a new supplier to the database.
When dealing with a supplier, often there are certain individuals with whom you regularly have contact. Use the Contacts tab to record pertinent facts about each of these contacts.

The top area of the Contacts tab displays the contacts as you enter them. The bottom area of the Contacts tab lets you enter details about each contact. As you enter a contact name and press the TAB key, the name immediately appears at the top of the list displayed. After you have entered all fields for a contact, click the New button to enter another one or click OK to confirm the addition of the record to the database.
The Primary Contact is the main person to contact if there are multiple names on the contact list. Click this checkbox for the contact you want to designate Primary.
The Comments tab provides an unformatted area in which you can enter information related to the supplier. It can be a description of an event, a summary of products offered, or any other pertinent facts about the supplier.
The Addresses tab allows you to supply different addresses for mailing, remittance, and shipping for the supplier if needed. The values appearing in dropdown lists in other notebooks in TabWare originate from the Addresses tab of the Supplier Notebook. For instance, the Invoice Matching Notebook allows you to choose a Remittance address for the supplier; the Shipping Notebook allows you to choose a Shipping address.
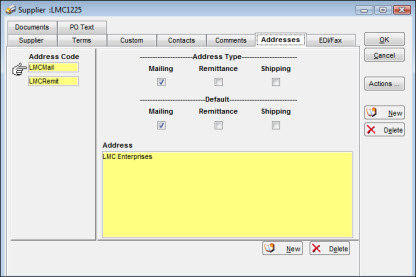
A supplier can have multiple address codes maintained for each category with this window. However, you can only identify one code per category to be displayed as the default in other notebooks. Select the appropriate Default checkbox for the code that should be displayed for each category for this supplier. Click the New or Delete buttons to add or delete supplier addresses.
Note: An address that is currently being used cannot be deleted.
The EDI/Fax tab allows you to record the preferred method of sending a purchase order and/or a fax to the supplier. Tabs for Send Purchase Order By and Send RFQ By allow you to enter this information for both purchase orders and requests for quote. Information entered on these tabs provide the default method of communication to the Terms tab of the Purchase Order Notebook and the Suppliers tab of the Request for Quote Notebook.

When you click the EDI checkbox on the Send Purchase Order By tab, TabWare provides additional fields for entering information that can be exported to your EDI translation software package (these fields are not visible unless the EDI option is checked). Electronic Data Interchange (EDI) is the system-to-system exchange of information in a designated format. The ANSI X-12 format is a generally accepted method for exchanging information electronically. These data fields relate to the EDI-X-12 Interchange Header (ISA) and additional data which may be used for communication needs such as Communication Phone, Password 1, and Password 2.
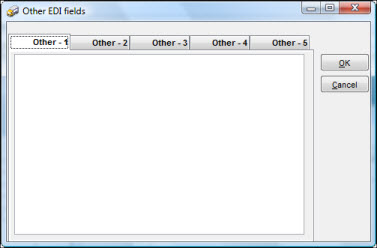
If additional fields are needed to maintain EDI/Fax information, click the Other EDI Fields button to display additional text entry fields.
A transaction set is the record formats for the data sent/received in a business transaction. Need more information on this.
![]()
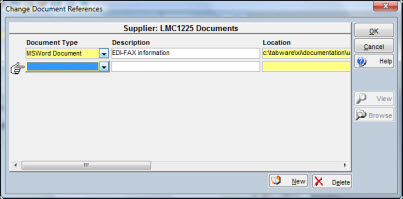
From the Documents tab of the Supplier Notebook, you can view or link documents to a supplier. Depending on how your system administrator set up the Supplier Notebook in the Setup module, you can link to documents stored on certain preset paths or link to documents stored on paths that you set.
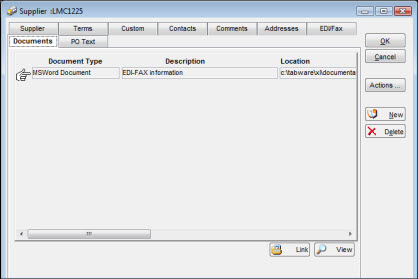
To Create a Document Link:
|
1. |
Click the Links button on the Documents tab to display the Change Document References window.
|
|
2. |
Click the New button. |
|
3. |
Enter values for the Document Type, Description, and Location fields. |
|
4. |
Click Type to see a dropdown list of types of documents and select the appropriate type. |
|
5. |
Enter a description in the Description field. |
|
6. |
Click the Browse button and select the document. |
|
7. |
Click OK to add the reference to the database. |
This tab is visible if your site is using the PO Text functionality defined in Purchasing Setup. Text linked to a supplier on this tab will be associated automatically to all purchase orders for that supplier.
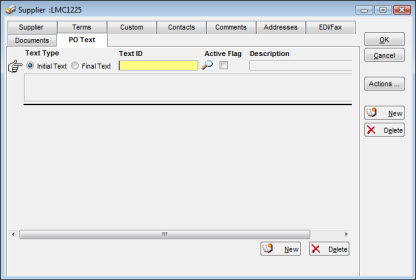
To Link a Block of Text:
|
1. |
Click the Add button and enter the desired Text ID or click the magnifying glass icon to search for the desired text. Once the Text ID is entered, the window displays the 40-character description and one row of the text. The description and text cannot be modified in this window. To change the description or the text, you must use the Purchasing Text window in the Setup module. |
|
2. |
After entering the Text ID, select a radio button to specify if the text block should print in the Initial Text or Final Text section of the purchase order. The default selection is Initial Text (either the Initial Text or Final Text radio button must be selected). The Text IDs are displayed on the Supplier Notebook in alphabetical order. |
|
3. |
An error message will be displayed if the user enters a Text ID that is flagged in the Setup module as Display on all Purchase Orders as Initial Text or Display on all Purchase Orders as Final Text. |
|
4. |
An error message will be displayed if the user attempts to assign an inactive Text ID to a supplier. |
|
5. |
Click OK to add the text to the database. |