|
|
|


|
|
|
The Requisition Search window lets you display records from the database and then perform further processing, which can include printing a list, using sort and filter features, or highlighting records for extended processing in another window.
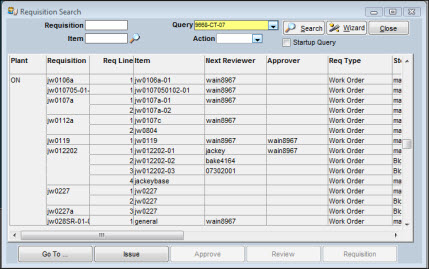
This window displays data in columns and rows by record. The columns can be moved to new locations as necessary to enable you to view the information in the order you want.
Navigation buttons appear at the bottom of the search window so you can quickly access other functions. In some cases, you may want to use information displayed from a search to jump to another function.
The Go To button gives you access to other functions related to requisition processing. You can view requisition details by highlighting one or more records from a search and then clicking the Requisition button. If you have authority to approve requisitions, you can perform a search, highlight multiple records, and then click the Requisition Approval button. The Issue button lets you issue requisition items where the source of supply is your internal storeroom.
You can print information about unapproved system-generated reorders for a designated timeframe from the Go To-Reorder Report selection. If your facility is using Multiple Warehousing, you can print this information for any stores location or for all locations.
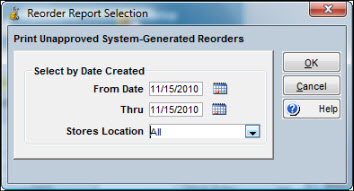
To Print Unapproved System-Generated Reorders:
|
1. |
From the Requisition Search window, click Go To and select Reorder Report. |
|
2. |
Click the calendar icon to the right of the From Date field and select the beginning date of the report. |
|
3. |
Click the calendar icon to the right of the Thru field and select the ending date. |
|
4. |
The Stores Location shows your default stores location as specified in Setup. However, you can change the location by clicking the dropdown arrow and selecting another location or select All to include all stores locations in the report. |
|
5. |
Click OK. |
Three fields at the top of the search window allow you to control the quantity and type of information displayed. You can enter full or partial values for Requisition number and Item number. The values entered become add-ons to the search criteria of the query you selected to use. Actions can be left blank, or, if you are an authorized approver, used to select the appropriate option when you want to approve or cancel approval for a group of requisitions.
To Initiate a Requisition Search:
|
1. |
Optionally, click the dropdown arrow next to the Query field to display a list of available queries. |
|
2. |
Optionally, enter values for Requisition Number and Item Number. |
|
3. |
Optionally, select an Action. |
|
4. |
Click the Search button to show a list of records for requisition items matching the selection criteria. |
|
5. |
Double-click on a row to display the set of windows related to the item; highlight one or more records and select a button at the bottom of the window; or select options from the Go To dropdown list. |
Note: Hold down the CTRL key to select multiple records.
Click the Wizard button to create a custom query or to make changes to an existing query. For more information on queries, see Queries in System Features.