|
|
|


|
|
|
The Item Search window allows you to display inventory records according to your selection criteria and to sort and/or filter the resulting set of records. You can then select items for further processing or print the results to a network printer.
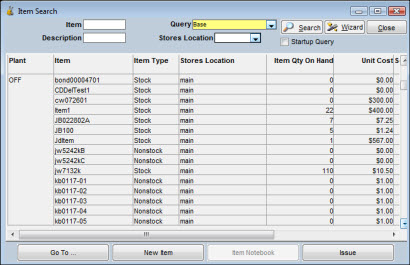
The Item Search window displays data in columns and rows by record. The columns can be moved to new locations as necessary to enable you to view the information in the order you want. You can also adjust column widths by dragging a vertical heading line to the right or left.
Navigation buttons display at the bottom of the search window so you can quickly access additional functions of the Inventory module. The Go To button allows you to jump to the Inventory Issues, Inventory Returns, Shipping Order Search, and Requisition Search windows as well as several other windows that you can use to perform inventory tasks. The Item Notebook button opens the Item Notebook, and the Issues button opens the Inventory Issues windows, which is used to record item issues.
In the field at the top left of the Item Search window, you can enter a value for a full or partial item number. Otherwise, the search uses the selection criteria built into the designated query being processed.
To Initiate an Item Search:
|
1. |
Click the dropdown arrow icon in the Query field and select from the list of available queries or enter a full or partial value for Item number. |
|
2. |
Click the Search button to show a list of records for inventory items matching the selection criteria. |
|
3. |
Double-click a record to display the related Item Notebook or click one of the buttons at the bottom of the window, such as Item Notebook, Issue, or one of the selections under Go To. |
Note: Hold down the CTRL key while clicking to select multiple records. When you select multiple records, you can progress through the displays by clicking on the Prior or Next arrows on the Item Notebook.
Whenever there is a search icon next to an Item field, click the icon to open the Item Search Popup window. For example, after selecting a record in the Item Search window, click the Item Notebook button. When the Item Notebook opens, an icon displays to the right of the item number field. Click the icon to open the Item Search Popup window.
Click the Wizard button to create a custom query or make changes to an existing query. For additional information about creating custom queries, refer to Queries in System Features.
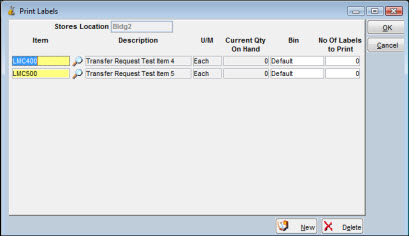
TabWare allows users to print labels for selected items from the Item Search window. If you have a label printer defined in the User Setup section of the Setup module and you also have security access to Item Search and Print Labels, you can print labels.
To Print Labels:
|
1. |
Select the item or items for which labels will be printed. |
|
2. |
Click the Go To button and select Print Labels from the dropdown menu. The Stores Location popup displays. Select the Stores Location from the dropdown list and click OK.
|
|
3. |
The Print Labels window displays.
|
|
4. |
If you selected items from the Item Search window, they are listed. If not, enter the item number or click the icon to the right of the Item field to search for item numbers. |
|
5. |
The number of labels to print defaults to the current quantity on hand. Enter the number of labels to print if a different quantity is needed. |
|
6. |
Optionally, click the New button to enter more items. |
|
7. |
Click OK to print. |
Note: TabWare also offers the option to print labels at receipt time.
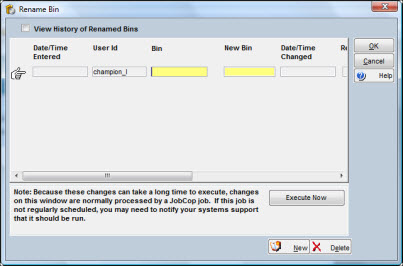
When circumstances require it, you can assign a new ID to an existing inventory bin. After you have provided the new name, the normal process is to have JobCop implement the change throughout all records on the database.
To Rename a Bin:
|
1. |
Access Item Search. |
|
2. |
Click Go To. |
|
3. |
Click Rename Bins from the dropdown list. The Rename Bin window opens, showing your user ID. |
Note: The window also allows addition of other bins that can be identified for renaming.
|
4. |
Optionally, click the checkbox to View History of Renamed Bins. The window displays bins that have been previously renamed as well as those scheduled for renaming. Bins previously renamed have a value for Date/Time Changed. |
|
5. |
Enter a value for Bin and New Bin. Optionally, click New to rename another bin. |
|
6. |
Click OK if JobCop will be scheduled to handle the insertion of new names throughout the database. TabWare inserts values for Date/Time Entered. |
|
7. |
If the changes will not be processed through JobCop, click Execute Now. |
Note: Because these changes can take a long time to execute, changes on the rename window are normally handled through JobCop. If the job is not on a regular schedule, you may need to notify your systems support personnel to have it executed. When the new name has been inserted in all related records, JobCop inserts the Date/Time Changed in the rename record.