|
|
|


|
|
|
The Work Order Setup Options window allows the system administrator to select options for controlling how the system operates when processing information related to work orders.
To Access Work Order Setup Options:
|
1. |
Click the Setup icon on the TabWare Power Panel. |
|
2. |
Click the Customizing TabWare button on the Setup Power Panel. |
|
3. |
Click the Setup Options button in the Customizing TabWare window. |
|
4. |
Scroll down the Modules block and highlight Work Orders in the System Setup window. |
|
5. |
Click the Setup Options button to open the Work Order Setup Options window. |
|
6. |
Enter values for the appropriate blocks. |
|
7. |
Click OK. |
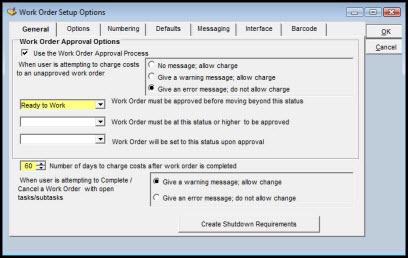
General Tab
Work Order Approval Options
Use the Work Order Approval Process
If you select this option, three more responses are required for operating the work order approval process.
Attempting to Charge Costs to an Unapproved Work Order
You can choose to display a warning, an error message, or no message at all when a user attempts to charge costs to an unapproved work order. Your options are: No message; allow charge; Give a warning message, allow charge; and Give an error message; do not allow charge. Select the option that best meets your operating requirements.
Work Order Status/Approval Required
Use the dropdown list to select the work order status. When using the approval process, you must approve a work order before you can upgrade it to a status beyond the one selected from the dropdown list.
Work Order Status/Before Approval
Select from the dropdown list the status at which a work order must be before it is eligible for approval. Work orders at status levels lower than this cannot be approved. When a work order reaches the status selected here, TabWare sends a message to the approver notifying that the work order is ready to be approved.
Work Order Status/Upon Approval
Use the dropdown list to select a work order status. A work order will be automatically upgraded to the selected status when it is approved.
Number of days to charge costs after work order is completed
Click the up or down arrows to set the number of days after a work order is completed that the system will allow additional costs to be charged to it.
Attempting to complete/cancel a work order with open tasks
If a user attempts to either mark as complete or cancel a work order that has open tasks associated with it, you can either have TabWare give a warning and let the completion/cancellation continue or you can have TabWare respond with an error message and not allow the completion or cancellation. Select the appropriate radio button to indicate your setup choice.
Create Shutdown Requirements
The program updates material requirements for inventory items that have been planned for work orders having a shutdown code. The calculations add Quantity Planned on the work order to Quantity Required on the inventory record. The program does not create material requirements until the date entered in Create Material Requirements Date for the Shutdown Code field is equal to or later than current date. Changing material requirements in the Inventory module triggers the calculation used for checking the reorder position and may create new reorders in TabWare.
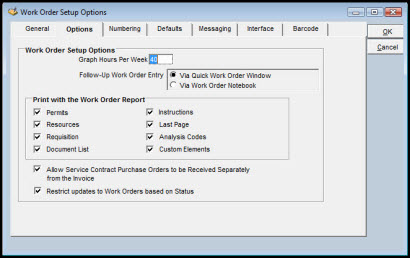
Options Tab
The Work Order Setup Options window enables the system administrator to specify the following:
The default hours worked per week for use by TabWare analytics
The work order entry window which should open when the user requests a follow-up work order when completing the initial work order
The sections to print for the Work Order Report
If the Allow Service Contract Purchase Orders to be Received Separately from the Invoice flag is checked, then those clients using the Invoice Matching module can receive service contracts in the Service Contract Receipts window. The invoice will no longer post the receipt to the system.
If the Restrict updates to Work Orders based on Status flag is checked, then a user can only update work orders that are at a status they have access to. All other work orders can be viewed in Inquiry mode.
Numbering Tab
Each of the five work order types - Routine, Emergency, Standard Requests, PM Work Order, and PM Master Plans - can have its own scheme for numbering work orders. You can choose from the following four options when selecting a method for each of the work order types.
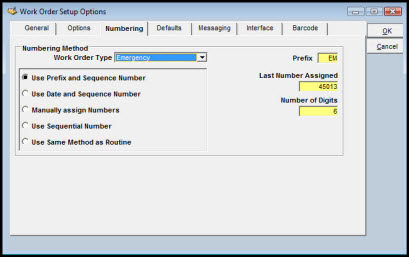
Use Prefix and Sequence Number
The work order base number is eight characters long. The prefix you enter must be at least one character but no more than five characters. The positions not used for the prefix are assigned to the sequential number that has from three to seven digits, including leading zeros. Enter a value in the Last Number Assigned box to indicate where you want the sequence number to start.
If you select this option for a particular work order type, the base number consists of a six-digit date plus a sequence number starting with 01. The date portion of the number appears in YYMMDD format. During actual operation of the system, the sequence number resets to 01 whenever the calendar date changes. You cannot use Prefix and Last Number Assigned fields with this option.
If you select this option, the user must enter a value for the work order number when creating a new work order.
If you select this option, you must provide values for Last Number Assigned and Number of Digits. The value you enter for Number of Digits must be greater than zero but less than nine. If you select this option for more than one work order type, be sure to size blocks properly for Last Number Assigned.
Rollover Technique for the Use Sequential Number Option
When you select the Use Sequential Number option, you must enter the number of digits to be used. Suppose you select five as the length and 00001 as the first work order number assigned. If, by chance, you create more than 99,999 work orders, here is how the system handles rollover of the number: If the last number assigned is 99999, then the next block of numbers assigned will be A0001 through A9999. When the last number assigned reaches A9999, the next number assigned will be B0001. This logic continues through assignment of Z9999. In this rollover scheme, note that work order numbers A0000, B0000, and so on, never occur.
Sharing One Numbering Scheme Between Multiple Work Order Types
You can have one bank of work order numbers shared among multiple work order types sharing the scheme selected for routine work orders. For example, for routine work orders, you can select the Use Sequential Number option and specify that the number is six digits long and starts with 000001. When selecting a numbering scheme for emergency and PM work orders, you can choose the Use Same Method As Routine option. If you select this option, all three work order types share one sequence of numbers.
Defaults Tab
The Work Order Setup Options - Defaults window allows the system administrator to select default values for automatic display with certain data elements related to work order processing.
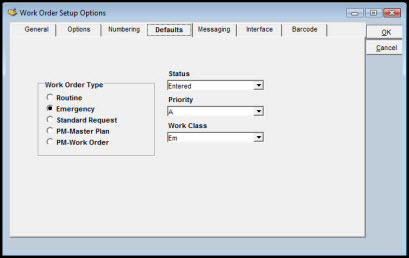
After you make selections from this window, the values you choose appear as defaults for the respective fields whenever a user creates a work order. The user has the option of overriding each of the default values with another valid value as the work order is being created.
Messaging Tab
If your site uses the Work Order Approval and Messaging options, you can establish criteria for automatic routing of messages. The criteria consists of selecting who receives a message and deciding when a message originates.
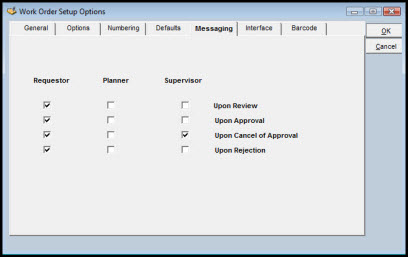
A check in the box at the intersection of the column for either the requester, the Planner, or the Supervisor and the row containing the appropriate message origination time tells TabWare to notify the indicated person at that time.
Interface Tab
Information coming from sources other than TabWare, such as condition monitoring equipment, can be used to cause TabWare to generate work orders. Use the Interface Tab to define alarm codes and to associate specific alarm codes with a Standard Request or a Master Plan and, optionally, an equipment number. Enter an alarm code in combination with a Standard Request/Master Plan, and TabWare automatically generates a work order based on that master plan or standard request when the alarm is received through the work order interface. If the emergency box is checked, the work order generated will be an Emergency work order rather than a Routine work order.
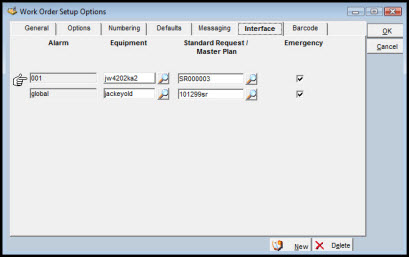
To Use the Interface Tab:
|
1. |
Click the New button to enter a unique alarm code in the Alarm column. |
|
2. |
Click the Equipment column. An equipment location can be entered to be associated with that alarm code. If you enter an equipment location, it will be used on the generated work order when the alarm is received through the work order interface if no equipment location is supplied on the work order interface. Optionally, click on the question mark icon to open the Equipment Search popup window. |
|
3. |
Enter the Standard Request/Master Plan that should be used with this particular alarm code. Optionally, click on the question mark icon to open the Work Order Search popup window. |
|
4. |
Click the Emergency checkbox if the work order being generated should be an Emergency work order. |
|
5. |
Optionally, click the New button and repeat steps 1-4 for another alarm code. |
Barcode Tab
The Work Order Setup Options - Barcode window allows the system administrator to specify the barcode font, starting character, and ending character.

If Barcode Font is left null, TabWare uses its default barcode 3 of 9 Barcode.
Enter the required beginning and ending characters as defined by your barcode software. Usually, both the starting character and the ending character is an asterisk (*).
The barcode font must be installed on each client computer that uses the barcoding feature.
The following TabWare reports have configurable bar code fonts:
WO Print
Picklist Print
Cycle Count
Stores Request