|
|
|


|
|
|
Completion codes operate with the processing of work orders. You use three types of completion codes for describing the conditions found before the repair work started, identifying the equipment components repaired, and defining the actions taken to complete the repairs. Using the Setting Up Completion Codes by Equipment Class window, you can modify the list of codes assigned for use with a particular equipment class.
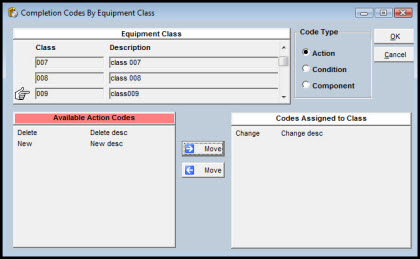
To Assign Codes to an Equipment Class:
|
1. |
Click the Setup button on the TabWare Power Panel to open the Setup Power Panel window. |
|
2. |
Click the Completion Codes by Equipment Class button on the Setup Power Panel. |
|
3. |
Click the Class box for a particular equipment class. |
|
4. |
Click a Code Type (Action, Condition, or Component). |
|
5. |
Click a code from those shown as Available. |
Note: To select multiple codes, hold down the CTRL key while clicking on the desired codes.
|
6. |
Click the button with the Move arrow pointing to the right. |
Note: Selected codes move to the Codes Assigned to Class list and disappear from the Available list.
|
7. |
Repeat steps 2 through 6 to assign another type of code to the same equipment class. |
Note: To assign codes to another equipment class, click on the appropriate Class box. Selection of a different class causes display of a window with the message Changes Made to Completion Codes by Equipment Class. Do You Want to Update Before Continuing?
|
8. |
Click the Yes button to add codes to the database for the prior Equipment Class chosen. |
|
9. |
Continue with steps 2 through 6 to assign codes for the latest Equipment Class chosen. |
|
10. |
Click OK when all entries have been completed. |
To Remove Codes from an Equipment Class:
|
1. |
Click the Class box for a particular Equipment Class. |
|
2. |
Click a Code type (Action, Condition, or Component). |
|
3. |
Click a code from those shown under Codes Assigned to Class. |
Note: To select multiple codes, hold down the CTRL key while clicking on the desired codes.
|
4. |
Click the button with the Move arrow pointing to the left. |
Note: Selected codes move from the Codes Assigned to Class list to the Available list.
|
5. |
Repeat steps 2 through 4 to remove another type of code from the list assigned for the same Equipment Class. |
Note: To remove codes from another Equipment Class, click on the appropriate Class box. Selecting a different class causes display of a window with a message Changes Made to Completion Codes by Equipment Class. Do You Want to Update Before Continuing?
|
6. |
Click the Yes button to remove codes from the database for the equipment class just chosen. |
|
7. |
Continue with steps 2 through 4 to remove codes from the latest equipment class chosen. |
|
8. |
Click OK when you have completed all entries. |