|
|
|


|
|
|
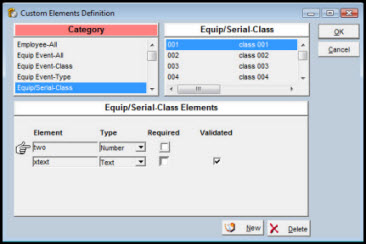
The Custom Elements Definition window allows you to create new elements or delete custom elements. This window has a number of main categories in the Category block of the window. Some categories have subcategories which will appear in the block in the upper right corner of the window. This block displays only for those categories that have subcategories. The lower half of the window contains a block listing the elements associated with the category or subcategory.
To Define a Custom Element:
|
1. |
Click the Setup button on the TabWare Power Panel to open the Setup Power Panel window. |
|
2. |
Click the Custom Element Definition button on the Setup Power Panel to open the Custom Element Definition window. |
|
3. |
Choose a category from the Category block. |
Note: Any subcategories available for the category chosen display in a separate block. Existing elements for the category chosen display at the bottom of the screen. If there are subcategories displayed in the Subcategory block, click on one to select it.
To Create a New Custom Element:
|
1. |
Click the New button. |
|
2. |
Enter a description in the Element field. |
|
3. |
Click the drop-down arrow on the Type field to select a type. |
|
4. |
Click the Required and Validated boxes, if appropriate. |
Note: Text is the only Element Type that allows an element to be validated.
|
5. |
Click OK when you have completed entering elements. |
To Delete a Custom Element:
|
1. |
Click in the area to the left of the Element box of the element to be deleted. |
|
2. |
Click the Delete button. A window displays with a warning message. |
|
3. |
Click Yes to continue. |
Note: You do not have to click OK to confirm deletion of the element.