|
|
|


|
|
|
Many of the TabWare screens display equipment, work order, inventory, and other data in a table format. You can adjust both the column width of the tables and the location of the columns. This section provides an overview of the query screen and its features. Subsequent sections provide detailed procedures for customizing query screen tables.
Your system administrator has access to the controls used when determining allowable record volumes displayed during a search. In the TabWare.ini file, the administrator maintains entries for three fields: AskRows, MaxRows, and AskRowsSummary.
For a search displaying detail records, you will see a warning if the number of records being retrieved exceeds the AskRows volume, but is less than the MaxRows volume. If the number of records found exceeds the MaxRows volume, you will see an error message that tells you to refine your query and retry. If you are doing a summary search, a warning message displays if the summary records developed exceed the value for AskRowsSummary.
Settings in the Security module determine whether users can search for data only on their login plant or whether they can search across all plants in the database. To allow users to query across multiple plant codes, the system administrator must do the following:
|
1. |
For each plant, create a Security Group that will have access to multiple plants. The name of this group must be spelled the same for each plant. |
|
2. |
Assign the user to each of the groups created. This will essentially make the user a member of the same group for multiple plants. |
|
3. |
For each plant being granted access, the system administrator must enable multiplant access to the Query Wizard, using the Define Window Access window in the Security module. For each plant, enable the security action Query Wizard - MultiPlant Enabled. |
Once these steps are completed, the user will be able to create queries that span more than one plant.
All queries have the ability to display from more than one plant except for the Resources Query, which contains sensitive data (pay rates).
Having MultiPlant enabled does not mean rows from all plants can be modified. The only rows that can be modified are those that belong to the plant the user originally signed into.
Once MultiPlant queries have been enabled, all queries will require Plant to be present in the query’s result set. If Plant is not part of the result set and the user double-clicks on a row, an error message will display stating the row cannot be modified until Plant is made part of the query.
In some cases you may want to move the location of a column in order to group data that is of particular interest to you. To move a column, place your cursor on the column heading and drag the column left or right to its new location. Any changes you make to the displays in a table format apply to that screen only and stay in effect until you finish your session. Other screens will display in the default column arrangement.
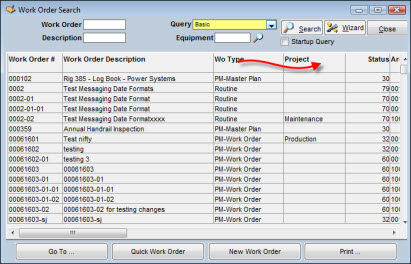
The following example shows the column headings in their default locations. By placing your cursor on the column heading, clicking and holding down the mouse button, you can drag the column to a new location.
When setting up a query, you have the option of clicking the Ask at Execution checkbox. This feature lets you enter selection criteria other than the default values previously entered in the Value/Criteria field.
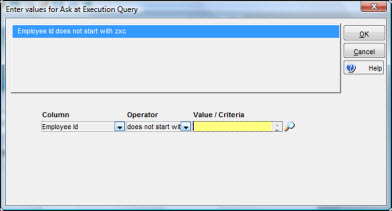
When you execute a query with this feature, a window displays that allows you to change the selection criteria. In the Value/Criteria field, enter or select values and click OK.
While the results of a query are displayed, you can adjust the width of the viewing area for a particular field. The adjustment remains in effect until you click the Cancel button on the main query window.
To Make a One-Time Adjustment to Field Size:
|
1. |
Move the cursor to the column headings area on the main query window. |
|
2. |
Move the pointer to a vertical boundary of the field you want to change, stopping the pointer when it becomes a line with arrows pointing right and left. |
|
3. |
Hold down the left mouse button and move the pointer to the right or left until the column is the desired width. |
|
4. |
Repeat steps 2 and 3 for other fields as required. |