|
|
|


|
|
|
The second window in the Query Wizard set asks What information do you want to see in this query? From this window you can select the elements that you want displayed. If the particular module has custom elements, you can select them from the list provided.
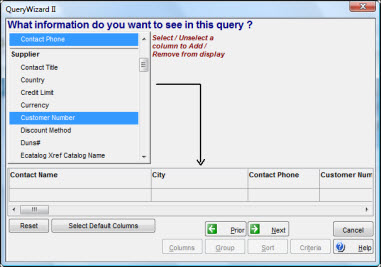
To Select Elements for Display:
|
1. |
If the module has custom elements, the heading Custom Elements displays in the list and contains the labels Element and Value. Click either label to display the custom elements available. |
Note: When you select a custom element, two columns are added - one for Element and one for Value.
|
2. |
Click to select elements from the list in the order you want the column headings displayed from left to right. |
Note: If you intend to use the results of your query in a notebook or to access the Go To button, you must select the default columns. If your query will only be used for reporting, these columns are not required. For information on default columns in Query Wizard, see Selecting Default Columns below.
|
3. |
Optionally, rearrange columns by clicking the heading, holding the mouse button down, and dragging and dropping the column to its new position. |
|
4. |
Optionally, change the column width by clicking on the column border, holding the mouse button down, and dragging the border to its new position. |
Note: The border becomes available for dragging when the cursor changes to a vertical bar with a horizontal arrow.
|
5. |
Click the Next button. |
If the intention of the query is to subsequently open a notebook or use the Go To button from the search window, TabWare requires that certain elements be included in the column selection. If you know what these required columns are, you can manually include them in your column selection. However, clicking on the Select Default Columns button will automatically include the information required to complete a particular query. You can then select the additional columns you need. If the query will only be used for report generation, the default columns are not required.
Notice that the list of available columns is divided into one or more categories. The first category listed is the base or parent category. Depending on the module in which you are working, there may be additional categories from which to choose. As a general rule, you can only select from two categories, and one must be the parent category. If you select from three or more categories, you may receive an error message. Some of these categories are directly related to the parent category and others may be related to the parent category only through their relationship with other categories. You will also receive an error message if you select columns from a category not directly related to the parent category and do not select headings from the category that links it to the parent. You must either deselect the columns from the unrelated category or select columns from a linking category that form an association to the parent category.
For example, in Requisition Search, you choose to display all of the Requisition Accounting columns and also display the Item Description. Although you only selected from two categories, there is no link between this information. You did not select anything from the parent, which in this case is Requisition.
Note: Be careful when creating queries containing numeric columns from multiple categories (tables). If you display totals or set the query style to Summary, you may see misleading results. Specifically, if you choose numeric columns from a parent/header category and from a child/detail category, the values from the parent/header category will be added into the Total Line multiple times (once per child/detail row). For example, suppose you create a Work Order Query displaying both Planned and Actual Costs. If a work order incurred actual costs over a two-month period, two rows of data would be displayed for the work order, and the work order's Planned Costs would appear doubled. Recommendation: If you want to create a Summary query with numeric columns from multiple categories, you should set the query style to Standard and review the totals. If the totals are accurate, you can then change the query style to Summary.
Depending on the module in which the query is taking place, certain computed fields and columns are available within the Query Wizard. The following explains how these fields are computed.
Total Planned Cost = sum of the five work order planned cost fields
Total Cost = sum of the ten work order actual cost fields
Extended Cost = the quantity of the item on hand times the item's unit cost
Excess Qty = quantity on hand less the maximum quantity
Excess Value = Excess Qty times the item's unit cost
Extended Cost = transaction quantity times the transaction unit cost
Remaining on Order = the quantity ordered less the quantity received
Computed Tax = the quantity ordered times the unit cost times the percentage of tax divided by 100
Cost with Tax = Computed Tax plus the Extended Cost
Received Not Invoiced = the quantity received less the quantity invoiced
Remaining Cost Not Invoiced = Extended Cost less the amount paid to date
Remaining to Issue = quantity requested less the quantity issued
Net Issues = quantity issued less the quantity returned
Extended Cost = quantity requested times the unit cost