|
|
|


|
|
|
Buyers and expediters can use these windows to plan and track activities related to purchasing activities. Using the Expediting Milestones window, activities for line items on a purchase order can be scheduled and then updated with actual dates for tracking schedule compliance. With the update of the schedule, the system projects new schedule dates based on estimated durations. The Purchase Order Activity Log includes records for expediting activity that has occurred.
To make use of scheduling features, the system administrator must add codes and descriptions for each of the activities to be scheduled through Validation Codes Valid Values-Expediting Milestones. Each code can be up to 25 characters.
The Purchase Order Expediting Backlog window displays expediting information, scheduled and actual, for purchasing activities. You can narrow the search by using selection criteria.
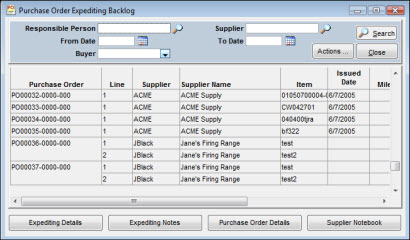
After executing a search, you can jump to other purchasing windows by clicking one of the buttons at the bottom of the window. The search window stays open when you jump to other windows. Using the window jump buttons, you can:
Add Expediting Milestones records for a selected purchase order line item.
Add Expediting activity to the Purchase Order Activity Log.
Jump to the Purchase Order Notebook for the selected purchase order.
Jump to the Supplier Notebook for the supplier shown on a selected purchase order.
To Perform a Search:
|
1. |
From the Purchase Order Search window, click the Go To button and then select PO Expediting Backlog. The Purchase Order Expediting Backlog window displays. |
|
2. |
Optionally, enter selection criteria for Responsible Person, Supplier, Buyer, or From and To Date. |
|
3. |
Click the Search button. |
Using this window, buyers and expediters can create and update a schedule for purchasing activities linked to a particular purchase order line item.
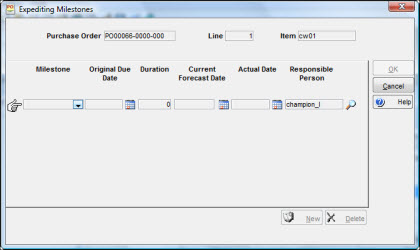
To Create an Expediting Schedule:
|
1. |
From the Expediting Backlog window, select a purchase order line item and then click the Expediting Details button, or from the Purchase Order Notebook-Line Items tab, select a line item and then click the Expedite button. The Expediting Milestones window displays. |
|
2. |
Click the Milestone field to select a Milestone Activity code from the dropdown list. |
|
3. |
Enter an Original Due Date and Duration. The Current Forecast Date defaults to the Original Due Date. |
|
4. |
Click the New button to add another milestone. When you select a Milestone Activity code, the Original Due Date defaults to the previous activity’s Original Due Date plus its Duration. |
|
5. |
Continue adding new milestones as needed. |
|
6. |
Click OK after adding the last activity. |
When creating a milestone, the Responsible Person field defaults to the user id of the person creating the milestone. It can be overridden, if needed, to show the person who has responsibility for completing the milestone.
Posting of an actual date for a milestone results in automatic update to schedule dates for subsequent milestones.
As purchase orders progress through activities to completion, the log file shows details for events that have occurred. For expediting activities, the log file can be accessed from the Expediting Backlog window by clicking the Expediting Notes button. You can also access the Activity Log from the Purchase Order Notebook.
