|
|
|


|
|
|
The line item window consists of two main sections: the top section displays an item list showing descriptions and quantities for all line items currently assigned to the requisition; the bottom section provides a data entry area for adding a new item to the requisition or updating an existing item. At the top of the main window is an Actions button that provides access to other requisition functions.
Note: Unless the item type has been defined as Allow Maintenance Technician to request item, users with Maint Tech security will not be allowed to requisition that item.
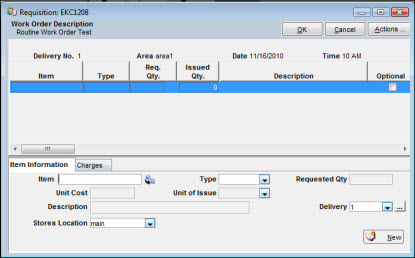
The data entry area consists of tabbed windows organized by the type of information being provided. The possible tabs displayed are Item Information, Charges, Purchase Description, Recommendations, Purchase Order Defaults, and Approval.
When opened, the line item window always displays two tabs -- Item Information and Charges. After you enter an item number or select an item type, the number of tabs displayed can increase, enabling you to provide more information. When determining which tabs to display, TabWare examines settings for item types defined in Setup Options. Typical item types include Stock, Non-Stock, General, Services, Vendor Stocking, and Consignment. Settings related to requisitions are:
Is the item type identified as Permanent, Temporary, or No Definition?
Is the item type always an outside purchase?
Does the item type have automatic approval for purchase?
Do you allow entry of purchase descriptions on requisitions for the particular item type?
Do you allow entry of unit cost on work order and charge-to-account requisitions for the particular item type?
Can users with limited security access request this item type?
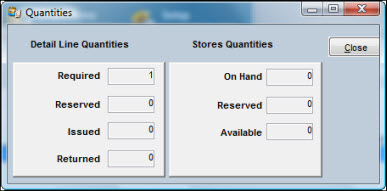
The top portion of the main window lists all the line items currently assigned to the requisition (use the horizontal scroll bar to view other available fields). Click the icon next to Requested Quantity to view the Quantities popup window.
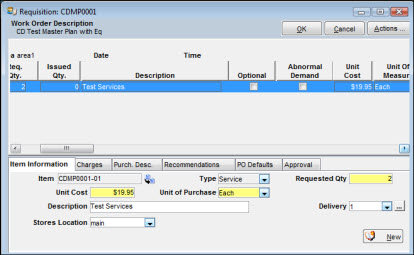
The Item Information tab is always the first tab displayed. On this tab, you can describe the item being requested and specify a quantity and unit cost, if applicable. You can also assign the item to one of the pre-defined deliveries. During the entry process you can set up a new delivery or view and copy information from the Inventory module.
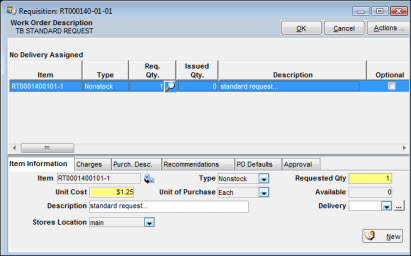
This field is protected if you are updating an existing line item. To change the item number, delete the line item and use the New button to enter the new information. Click the icon to the right of the field to copy item information from an Equipment Hierarchy or Item Search, or from a supplier catalog defined with TabLink.
When you enter a valid number recognized as Permanent by the Inventory module, TabWare automatically retrieves Type, Unit Cost, Unit of Purchase, and Description. The information is displayed when you press the TAB key after entering an item number.
If you are requesting a non-permanent item, you have the option of creating a number or letting TabWare assign one for you (TabWare assigns a number when you skip the Item Number field and choose an Item Type). The number assigned by the system consists of the requisition number followed by a dash, then a sequential assignment of numbers starting with 01.
If you enter an item number defined as Temporary, a warning displays if the item number was previously entered on another requisition.
When you enter a Permanent item number, this field is protected. To change the item type, delete the line item from your requisition and re-enter the new information. If the item number is not permanent, select a type from the dropdown list. The values displayed represent types defined as Temporary or No Item Created.
The value entered must be greater than zero.
Note: If Multiple Warehousing is being used at your location and the Inventory Setup option Perform Surplus Check if Item Unit Cost exceeds NNN (where NNN is the dollar limit that the item’s unit cost must exceed) is selected, then the surplus edit will be performed. If other stores locations within your plant have a surplus of that item, including the stores location on the current requisition line, TabWare displays a warning message. This edit is performed at the time of line entry, requested quantity update, review, and approval.
A value can be entered if the requisition type is Add to Reorder. If you are charging a work order or account, a value can be entered/updated if the Item Type Definition table contains a Yes value for the parameter Allow entry of unit cost. Under certain conditions, the field defaults to Last Price Paid or Current Price.
If the type of requisition is Add to Reorder, the label is Unit of Purchase. If you are charging a work order or account, the label is Unit of Issue when the item is Permanent.
When displayed, this field is always protected. For a Permanent item for which you are charging a work order or account, it represents quantity on hand minus quantity reserved as shown by inventory records.
If the item is Permanent, this field defaults to the description from inventory records and is protected. Otherwise, up to a 40-character description can be entered. Click the icon to the right of the field (if displayed) to view stores specifications, extended description, and purchasing specifications for the item.
Select the delivery number from the dropdown list. Click the ellipses to the right of the field to display the delivery information.
If Multiple Warehousing is being used at your location, this field is visible. If you are charging costs to a work order on which the associated equipment has a default stores location defined, this value will also default to the requisition. Otherwise, the stores location shown as your default in User Setup appears here. Stores location must be indicated unless the requisition is for PM Master Plans, Standard Requests, or for services or an item not in the Item Notebook.
This field only displays if the requisition type is Add to Reorder; thevalue is retrieved from inventory records.
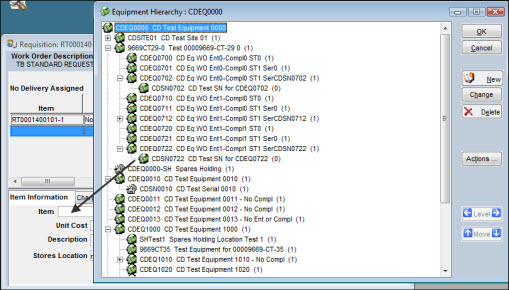
When planning materials for a requisition, you can display lists from which items can be copied.
If you are planning materials for a work order, you can copy items from the Equipment Hierarchy list for the Equipment Location ID referenced on the work order.
You can perform an item search and then drag and drop selected items to the requisition.
To Copy Materials:
|
1. |
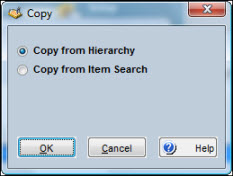
Click the icon to the right of the Item field on the Item Information tab of the Requisition window. The Copy window displays. |
|
2. |
Click the Copy from Hierarchy radio button to copy items from the equipment spare parts list or click the Copy from Item Search radio button to perform a search and then drag and drop items from the search window to the Requisition window. |
|
3. |
Click the Cancel button to close the hierarchy or search window. |
Choose from a list of previously-defined deliveries by clicking the dropdown arrow on the Delivery field or add a new delivery by clicking the icon to the right of the field.
The Optional and Abnormal Demand flags enable you to specify special processing for handling a requisition.
Note: These checkboxes do not display for users who have limited security access.
This checkbox appears if you are charging a work order, entering a Permanent item, and the item has not been defined as always outside purchase. Select the checkbox if, during work order execution, you want to show that the item may be needed as opposed to will be needed. When classified as Optional, the items appear on printed work orders as optional but do not appear on picklists, nor do they have any effect on requirements used in the reorder formula.
This checkbox appears if you are charging a work order and entering a Permanent item. Select the checkbox if you want to place a special order for an item and do not want that quantity to reflect in the day-to-day calculations of reorder. This feature allows you to force an “over-maximum” position in order to meet the special needs of a planned work order.
When setting up the requisition, one option is to enter charge information that defaults to all line items. If necessary, however, you can change the charge information for a particular line item on the Charges tab.
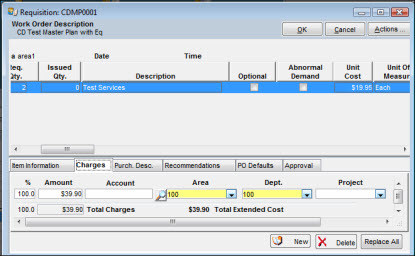
To Add a New Line:
|
1. |
Click the New button and complete the entry fields as needed. |
|
2. |
Change percentages as required for existing entries (percentages must total 100%). |
|
3. |
Click the Replace All button if you want the displayed cost distribution to apply to all line items on the requisition. |
When creating the requisition, you were prompted for a single work order number. While you cannot distribute costs to multiple work orders, you can create a distribution that includes the default work order number plus one or more accounts, areas, or departments using the above instructions.
Note: You cannot charge a work order that has a status of 79—Closed for Charges.
Use this tab to further describe the item being ordered. It is always available to requisitions classified as add to reorder and is also available for other requisition types where the item is permanent and item type has been defined as always outside purchase and allow entry of purchase descriptions.
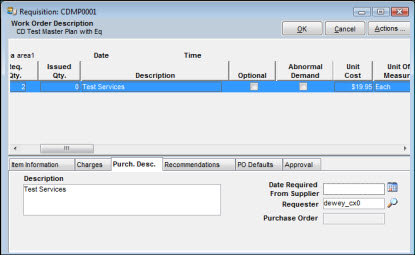
If the item is Permanent, this field defaults to the Purchasing Specifications values shown on inventory records. The field can be edited, but any changes made do not update the values in the inventory records. The updated text applies to this single requisition and to the purchase order it is later assigned to.
If the line item has a pre-defined delivery, this field will default to the date needed as shown with the other delivery information. Otherwise, you can enter a date, but it cannot be earlier than today’s date.
The first time this window opens, this field defaults to your TabWare user id. Click the search icon to search the Employee database and change the default user id.
When the item has been transferred to a purchase order, the PO number appears in this protected field. Click the icon next to the field to display the Purchase Order Notebook for the line item.
This tab can be used to include specific information such as a part number or recommended supplier.
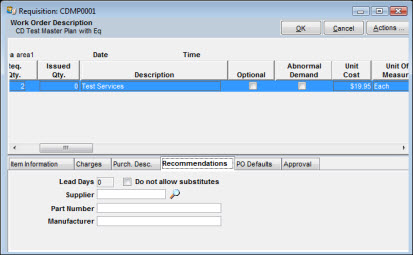
The Lead Days value defaults to the value from the Item Suppliers tab of the Item Notebook.
If the item entered is Permanent, this field defaults to the value shown on the first tab of the Item Notebook.
Supplier, Part Number, and Manufacturer
If the item being entered is Permanent and has supplier information available, these fields default to the values available. The supplier with the Preferred Supplier ranking provides entries for the fields. TabWare then looks at the first tab for part number and manufacturer. If changes are needed, click the search icon to search for a supplier.
The fields on this tab provide supplementary information to the purchase order.
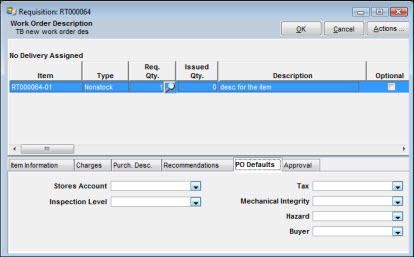
Stores Account, Buyer, Inspection Level, and Hazard
If the item is Permanent and carried on inventory records, these fields default to the values found. Otherwise, you can select a value from the dropdown list on each field.
There is no default value for this field. Select a value from the dropdown list.
If you are charging a work order, this field defaults to the value that exists on the work order. If the work order does not have a value, TabWare looks to the inventory record for a default value.
The Approval tab contains review and approval information.
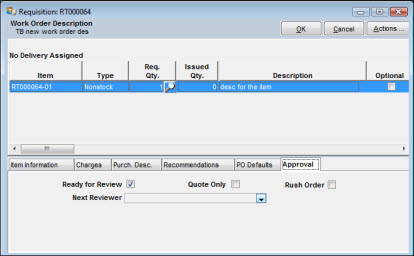
When you enter a new item, this checkbox is selected by default. Click the checkbox to deselect it and indicate the item is not ready for review.
Click this checkbox if you want the item to be quoted before a decision is made to purchase the item. This checkbox displays only if the item type is either temporary or no item created. Once quoted and the decision is made to purchase the item, uncheck this box to proceed with the purchase.
If this is a rush order, click this checkbox to notify the next approver of the need for immediate attention.
If the item is ready for review, select the next reviewer from the dropdown list. The value entered in the first line item on the requisition continues to succeeding lines with an option to override.
This protected field displays only if the line item has been approved for purchase.