|
|
|


|
|
|
The Cycle Count Entry window enables you to enter physical item counts to adjust inventory system balances. As balances are adjusted upward, TabWare checks work orders in awaiting material status for additional material allocations. When item balances are adjusted downward, TabWare tests the replenishment calculations to determine whether reordering is necessary to bring balances within desired limits.
The basic steps required to administer a Cycle Count Program are:
|
1. |
Use the Inventory Setup options in the Setup module to set up your cycle count program. |
|
2. |
Determine the number of bins to be included in the cycle count. |
|
3. |
Determine the number of bins to count daily. |
|
4. |
Use the JobCop program to generate cycle count reports. |
|
5. |
Distribute cycle count reports to the appropriate personnel. |
|
6. |
Perform a count of inventory bins. |
|
7. |
Post the counted bins to the cycle count. |
Steps 1 through 3 are performed when the cycle count program is first set up. Steps 4 through 7 are performed on a routine basis. There may be occasions when adjustments need to be made to the cycle count program. On these occasions, the system administrator may need to make changes to the setup options for the inventory cycle count setup.
Once the cycle count program is established, the system creates an adjustment transaction for each record where a count quantity has been entered. This includes bins where the entered count quantity equals the displayed quantity on-hand. The adjustments become part of the stores activity file, allowing reports to be printed on data reliability.
The Setup options in Customizing TabWare provide an on-demand generation of records into a backlog of bins to be counted. When you count bins that are not included in the current backlog, you can use this window to record the results for those random counts. For more information about customizing TabWare's cycle count feature, contact your system administrator.
Cycle count reports are typically printed on a routine basis using the JobCop program. Reports should include all the cycle count information necessary to maintain designated inventory levels. Your system administrator can assist you with obtaining the cycle count reports you need.
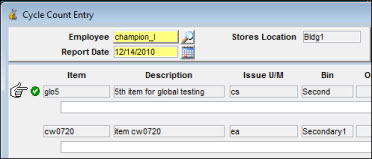
From the Setup module, your stores supervisor selects parameters to determine the bins that qualify for cycle count management. From the JobCop module, there is a standard job that runs to select the bins next scheduled for counting. When that job runs on a regular basis, the items selected display in the Cycle Count Entry window. Entry of counts to the Cycle Count Entry window updates the on-hand quantity on the inventory item table.
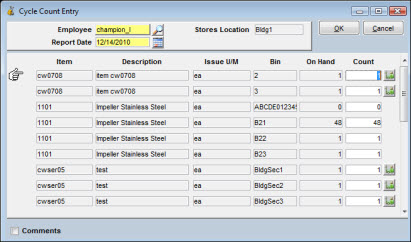
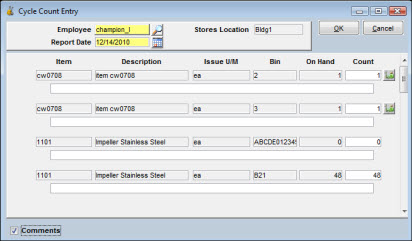
You have a choice of two windows when entering cycle count activity. The example shown above is the default window that displays when you select Cycle Counting from the Go To button on the Item Search window. If you want to enter Comments while entering Counts, you can select an alternate window by clicking the Comments checkbox at the bottom left. A new window displays showing a field for Comments, but the number of items displayed per page is lower.
If the bin being counted contains a serialized item, an icon is shown to the right of the Count field. Click this icon to open the Cycle Count - Serialized Items window and verify the serial numbers of the items that should be in the bin.
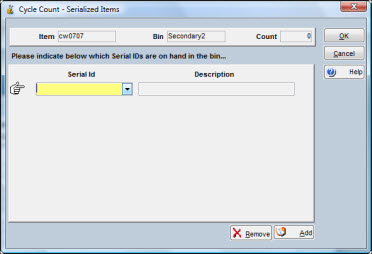
If the serial numbers of the items in the bin differ from the expected serial numbers shown on this window, use the Add and Remove buttons to enter the actual serial numbers. If you remove a serial number from this window, TabWare will update the Serial Notebook entry for the serial number as follows:
The serial number's bin assignment will be cleared.
While the status of the serial number will remain unchanged (either New or Restocked), the Serial Notebook's Reason Out Of Bin will be set to Missing.
If you enter a Count for a serialized item that differs from the expected quantity on hand, the Cycle Count - Serialized Items window will open automatically and you will be required to Add and Remove serial numbers from the list to match the Count being entered for the item.
To Enter Cycle Count Activity:
|
1. |
From the Item Search window, click the Go To button and select Cycle Counting. If you are using the Multiple Warehousing feature, select the stores location and click OK. The Cycle Count Entry window displays, showing the bins scheduled for counting. |
|
2. |
Optionally, click the Comments checkbox to display the alternate entry window. |
|
3. |
Enter the actual quantities under the Count column as recorded from physical bin counts. As you proceed from one bin to the next, a green check mark displays at the left margin, providing a way to determine which bins on the page have been processed.
|
Note: You can click a row to add or remove a check mark for a bin.
|
4. |
Optionally, enter Comments to explain a variance between new and old balances or to document other conditions at the time of the count. |
|
5. |
For serialized items, click the icon to the right of the Count column to verify the serial numbers of the items in the bin. |
|
6. |
Click OK after entering a quantity for the last item on the list. |
Unscheduled cycle counts may be performed as necessary. Use the following procedure to enter an unscheduled count.
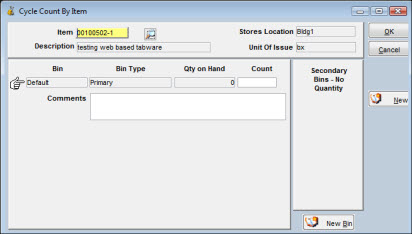
To Record a Random Count:
|
1. |
Click the Go To button from the Item Search window and select Cycle Count by Item. |
|
2. |
If applicable, select a stores location. |
|
3. |
Enter an Item number and press the TAB key. |
|
4. |
Value displays for Bin, Bin Type, and Quantity On-Hand. |
|
5. |
Enter the actual quantity on-hand in the Count box as recorded from a bin count. |
|
6. |
For serialized items, click the icon to the right of the Count column to verify the serial numbers of the items in the bin. |
|
7. |
Optionally, enter Comments. |
|
8. |
Optionally, click on New Bin to add a new bin to be counted. |
|
9. |
Click OK. |