|
|
|


|
|
|
The Employee Notebook provides a place to enter personnel data that may be useful to track. You can enter new employees using the first tab of the notebook and easily update information for existing employees. Currently, most of the fields are for record-keeping purposes only and do not have an effect on other functions of TabWare. Fields that impact other parts of TabWare are noted.
The Employee tab can be used to enter a new employee or to update information on existing employees.
To Access the Employee Notebook:
|
1. |
From the TabWare Power Panel, click Resources. |
|
2. |
From the Resource Search screen, enter information into the Employee or Employee Name field; select a search query and search for an existing employee; or click the New Employee button to enter a new employee. |

15-character alphanumeric field for the employee ID. If your plant is using the Messaging feature, the employee's login ID must be entered in this field.
Enter the employee's name in this field.
You can use this 15-character field to store the employee's social security number or any other identifying number you need to associate with the employee for use in your human resources system.
Date the employee was hired. Click the calendar icon to the right of the field to select the hire date.
Select the employee's supervisor name or code from the dropdown list.
Select the code for the department in which the employee works from the dropdown list.
Enter up to 20 characters to provide a building number, cubicle number, plant identifier, or any information your company deems useful.
Use the dropdown list to select the code for the shift to which the employee is assigned.
Use the dropdown list to select a skill code for the employee's job.
Note: This is not the same code as the resource/skill code used for work order planning and time reporting.
Select the appropriate code for the employee's pay (for example, Exempt or Non-exempt).
Select this checkbox if the employee's services are contracted.
Uncheck this box if the employee is no longer working at your site.
Note: Time charges cannot be entered for an employee who is not marked as Active.
Text entry field. Enter any information pertinent to this employee.
The Contacts tab provides a place to enter personnel information for each employee.

Enter the employee's mailing address, email address, and pager address as applicable. If your facility is using email with TabWare Messaging, you must enter the employee's email address in the Email Address field. When this feature is properly set up and used, a user's unviewed TabWare messages are also displayed in his external email window. This capability requires setting options in the employee's User Setup window.
Click the dropdown arrow to select the specific phone number to be entered. To add additional phone numbers, click the New button. To revise an existing number, click in the field and type the correct number. To delete an existing phone entry, highlight the field and click the Delete key.
You can enter up to 40 characters in both the Name and the Relationship fields of the Emergency Contact information fields. Enter the phone number of the person to be contacted in case of emergency.
Use the Resources tab to enter skill classifications for new or existing employees. To enter a new resource (skill) for an employee, click the New button at the bottom of the screen. To delete a resource (skill), highlight the resource skill and click the Delete button at the bottom of the screen.
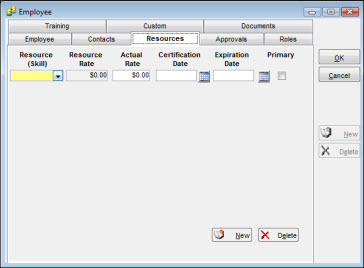
A Resource classification is an employee skill that you can assign as a resource to a work order. You can enter multiple skill classifications for each employee.
This is a protected field set by using the Valid Values window in the TabWare Setup module.
Enter an actual rate value for the employee if you prefer to calculate labor cost from an actual instead of an average rate.
If the employee holds a certification in the listed skill area, enter the effective certification date in this field.
If you entered an effective certification date in the Certification Date field, you can enter the date that the certification expires in this field.
Select this checkbox to flag a resource code as the employee's Primary Resource/Skill. When entering time for the employee, the Primary Skill will default into the time charge transaction.
As you build your database of active employees, you can identify the employee's responsibilities on the Approvals tab and specify spending limits if the employee has approval responsibilities.
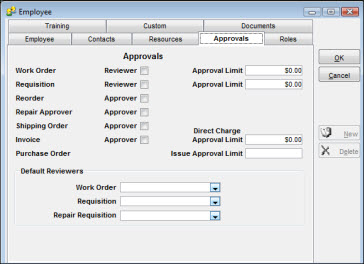
If the employee is an authorized reviewer of work orders, select the Reviewer checkbox. If the employee is an approver also, enter an amount in the Approval Limit field.
Note: Do not enter a currency symbol in the Approval Limit field. TabWare inserts the symbol for you.
If the employee is an authorized reviewer of requisitions, select the Reviewer checkbox. If the employee is an approver also, enter an amount in the Approval Limit field.
Note: Do not enter a currency symbol in the Approval Limit field. TabWare inserts the symbol for you.
Select the Approver checkbox if the employee has the authority to approve reorders.
Note: Employees with authorization to review and approve work orders only cannot approve reorders. Employees with authorization to approve reorders only cannot approve work orders.
Select this checkbox if the employee has the authority to approve requisitions for outside repair. This checkbox is displayed only if your site uses TabWare's Repairables Tracking feature.
Select the Approver checkbox if the employee has the authority to approve or reject shipping orders.
Select the Approver checkbox if the employee has authority to approve supplier invoices processed through the Invoice Matching module. Also, include the approver’s Direct Charge Approval Limit.
Note: Do not enter a currency symbol in the Direct ChargeApproval Limit field. TabWare inserts the symbol for you.
Purchase Order
When a work order, requisition, or repair requisition is entered, TabWare uses the Default Reviewers shown on this tab to determine the next reviewer. Click the dropdown arrow to enter a default reviewer for each item in the list.
You can link codes to the employee's ID by entering information on the Roles tab.
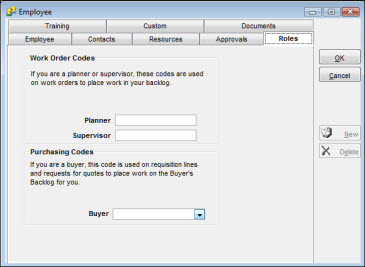
If the employee has responsibility for planning work orders or supervising craft workers, enter the appropriate code in the Planner and/or Supervisor fields to link the code to the employee ID. When creating work orders, these codes appear on the notebook in the Planner and Supervisor fields.
Use this section of the window to link an employee ID to a Buyer code that exists in Setup-Valid Values.
The Training tab provides a place to record training courses an employee takes. You can enter the date the course was taken, the expiration date of any accreditation, and the grade received.
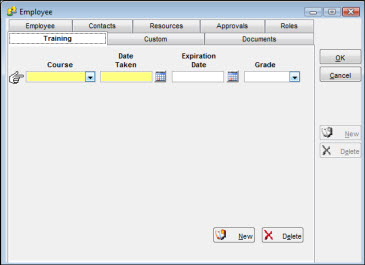
To Enter Information on the Training Tab:
|
1. |
Click the dropdown arrow to the right of the Course field and select the name of the course. The course choices are set by using the Valid Values window in the TabWare Setup module. |
|
2. |
Click the calendar icon to the right of the Date Taken field to enter the date the course was taken. |
|
3. |
If the course accreditation carries an expiration date, click the calendar icon to the right of the Expiration Date field to enter the expiration date. |
|
4. |
Click the dropdown arrow to the right of the Grade field to enter the grade earned in the course by the employee. |
|
5. |
To enter another course, click the New button at the bottom of the screen. |
|
6. |
Click OK to save the information. |
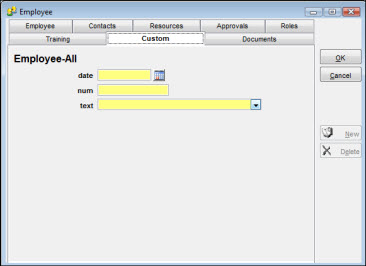
A custom element is an information field that is unique to your operating environment and therefore not available from any other standard window. Through the Setup module, you can define custom elements and assign them valid values that enable you to track custom information needed by your organization.
From the Documents tab of the Employee Notebook, you can view or link documents to an employee's records. Depending on how your system administrator has set up the Employee Notebook in the Setup module, you can link to documents stored on certain preset paths or, optionally, link to documents stored on paths that you set.
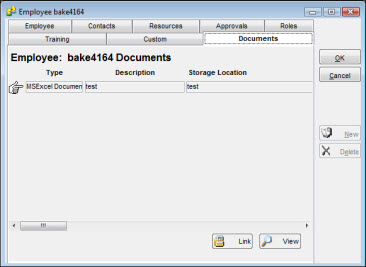
To Create a Document Link:
|
1. |
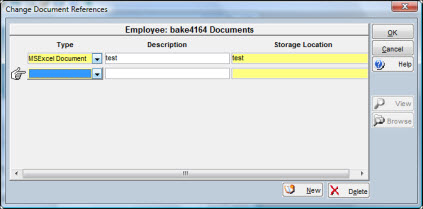
Click the Links button on the Documents tab to display the Change Document References window.
|
|
2. |
Click the New button. |
|
3. |
Enter values for the document Type, Description, and Storage Location fields. |
|
4. |
Click Type to see a dropdown list of document types. Select the appropriate type. |
|
5. |
Enter a description in the Description field. |
|
6. |
Click the Browse button and select the document. |
|
7. |
Click OK to add the reference to the database. |
You can use the following procedure to update information for an employee who already exists in the system.
To Update an Employee:
|
1. |
Click Resources on the TabWare Power Panel to display the Resource Search window. |
|
2. |
Click the Search button to display records from the database and scroll to the desired record, or enter a full or partial value in the Employee ID field and click the Search button. |
|
3. |
Select one or more records. |
|
4. |
Click the Employee button to open the Employee window for the first employee selected. |
Note: To select multiple records, hold down the CTRL key while you select the desired records.
|
5. |
Enter new values into the appropriate fields. |
Note: If you selected more than one record, you can click the Next or Prior buttons to move from one window to another.
|
6. |
Click OK to return to the Resource Search window. |