|
|
|


|
|
|
The Worker Time Reporting button at the bottom of the Resource Search window provides access to the Worker Time Reporting window. Using this window, you can:
post time spent on work for a given employee on a particular day
make needed changes to charges already posted
view time charged by users over a specified period of time
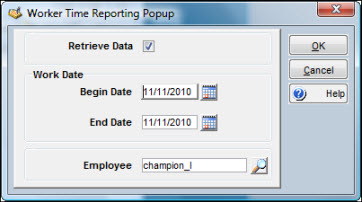
The Worker Time Reporting Popup window facilitates these objectives based on your input.
To Post Worker Time:
|
1. |
Select Resources on the TabWare Power Panel to open the Resource Search window. |
|
2. |
Optionally, enter selection criteria in the Employee ID and Query fields, click the Search button, and select one of the displayed employee records. |
|
3. |
Click the Worker Time Reporting button to open the Worker Time Reporting Popup window. |
|
4. |
To enter previously unrecorded charges, uncheck the Retrieve Data box. The Begin and End Dates default to the current date and Employee defaults to the current user ID. |
Note: To see all transactions within the defined time period, leave the Employee value blank. Also, the Security module allows you to restrict a user’s ability to make time entries for other Employee IDs. Look for the security entry for the Worker Time Reporting window titled Has access to other employee IDs.
|
5. |
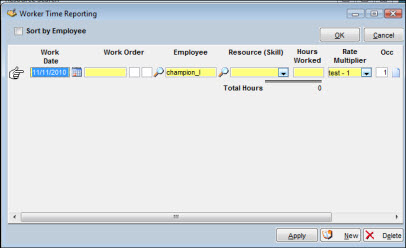
Click OK. The Worker Time Reporting window opens. |
|
6. |
Enter a labor transaction, including the work order number, hours worked, and other transaction values as necessary. Keep in mind that you cannot post worker time if you are changing the status of the work order to 79—Closed for Charges. |
Note: If the employee has only one skill code, TabWare defaults that code into the Resource (Skill) column. If the employee has more than one skill code and one of those codes has been flagged as Primary in the Employee Notebook, then the Primary skill is shown. Resource (Skill) codes marked as Inactive in the Setup module are not included in the dropdown list.
|
7. |
Press the TAB key to move between fields or enter another transaction. |
|
8. |
Optionally, click the New button to add a new line for an additional entry. |
|
9. |
Optionally, click the Comment icon at the end of the row to enter comments that can be viewed through the Labor Activity Search window. |
|
10. |
Click the Apply button to enter the changes you have made so far; continue to enter changes or click OK after entering the last transaction for the employee. |
To Modify or View Previously Entered Time Charges:
|
1. |
Select Resources on the TabWare Power Panel to open the Resource Search window. |
|
2. |
Optionally, enter selection criteria in the Employee ID and Query fields, click the Search button, and select one of the displayed employee records. |
|
3. |
Click the Worker Time Reporting button to open the Worker Time Reporting Popup window. |
|
4. |
To retrieve charges previously entered over a period of time, select the Retrieve Data checkbox and, using the calendar icons, enter the beginning and ending dates for the period you want to see. |
|
5. |
To see charges for all employees with charges for the specified period of time, delete the employee id from the Employee field and leave it blank. |
|
6. |
Click OK. The Worker Time Reporting Window opens. |
Note: If there is a checkmark in the Sort by Employee box, TabWare groups and sorts by employee and work date, and also displays Individual Employee Hours subtotals. If you remove the checkmark, the rows are displayed in the order that they are entered and are not re-sorted by employee.
|
7. |
Make changes as needed. TabWare displays the updated entries. |
|
8. |
Optionally, click the Comment icon at the end of the row to enter comments that can be viewed through the Labor Activity Search window. |
|
9. |
Click Apply to enter your changes to the database and remain in the window. Click OK to enter your changes and close the window. |